If you have purchased Business Email Hosting through FastPanda and your domain’s NS (Name Server) records are pointed to FastPanda, and you are also using cPanel, you need to update your DNS records through cPanel in order to use the service actively.
To access the DNS records, you can click the link below and follow the steps.
- If you have accessed your DNS records, the next step is to add them one by one to cPanel. Log in to your cPanel account. If you are using cPanel through FastPanda, you can follow the steps below.
Link: https://www.fastpanda.co.uk/knowledge-hub/how-to-log-in-to-cpanel/
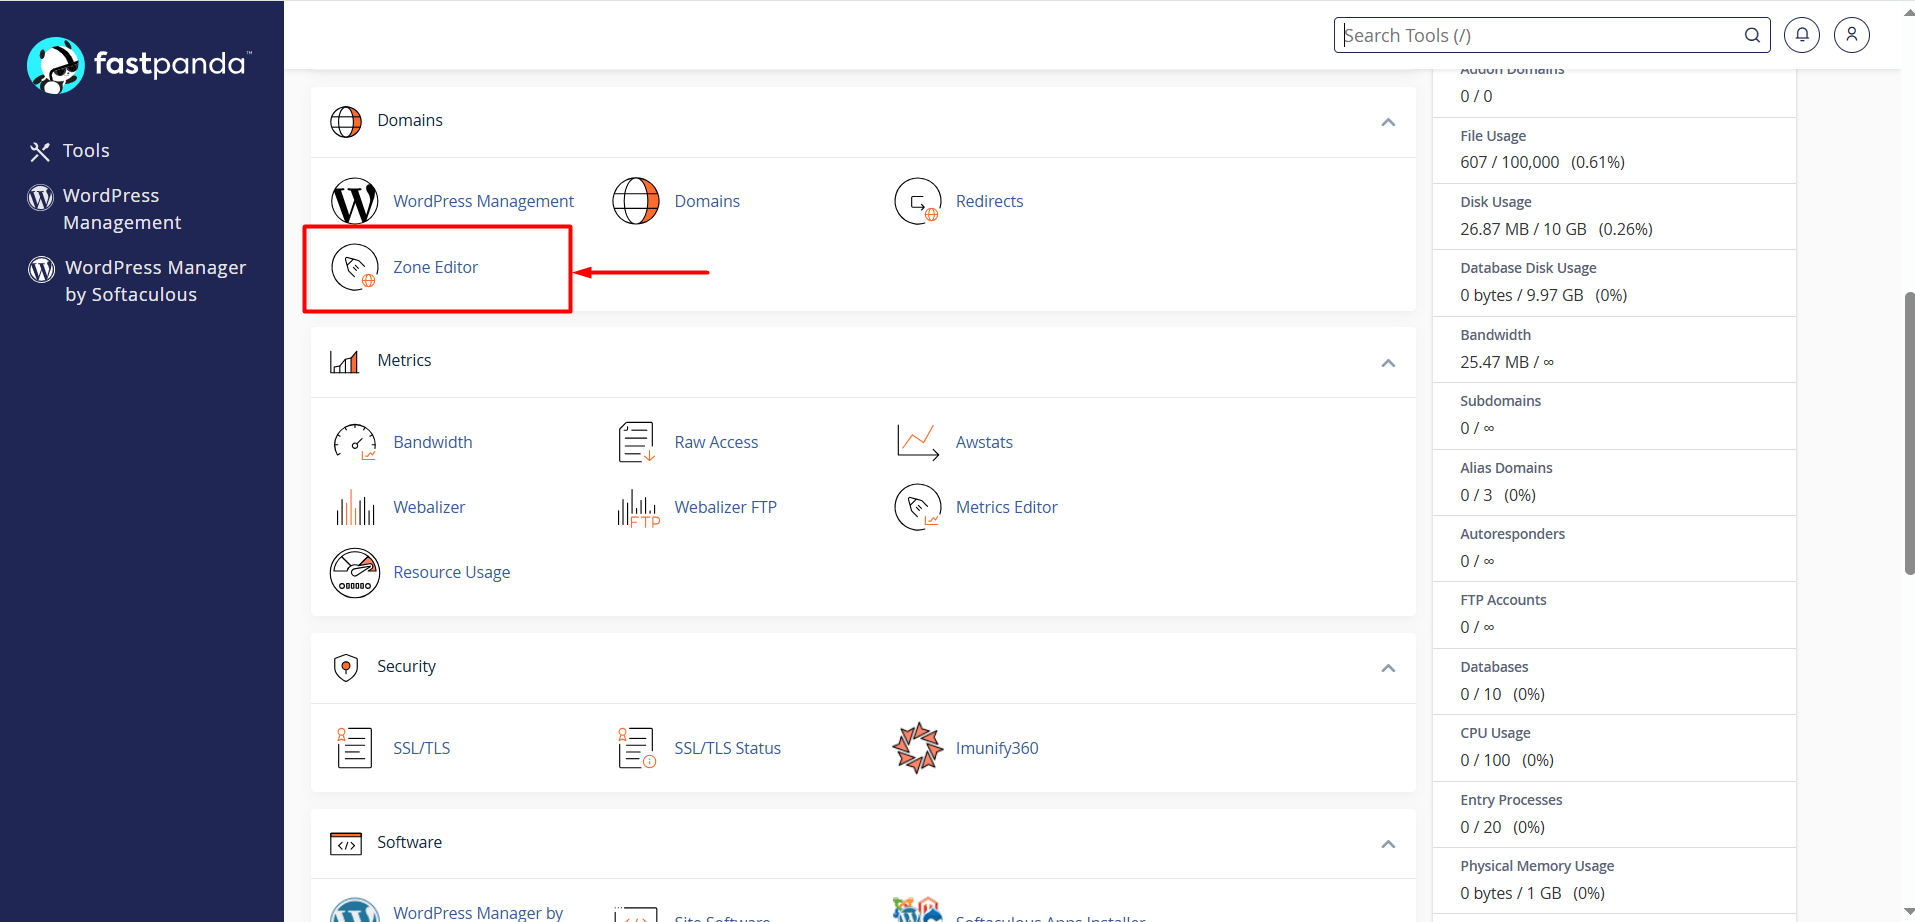
- Once you have accessed cPanel, click on the “Zone Editor” button.
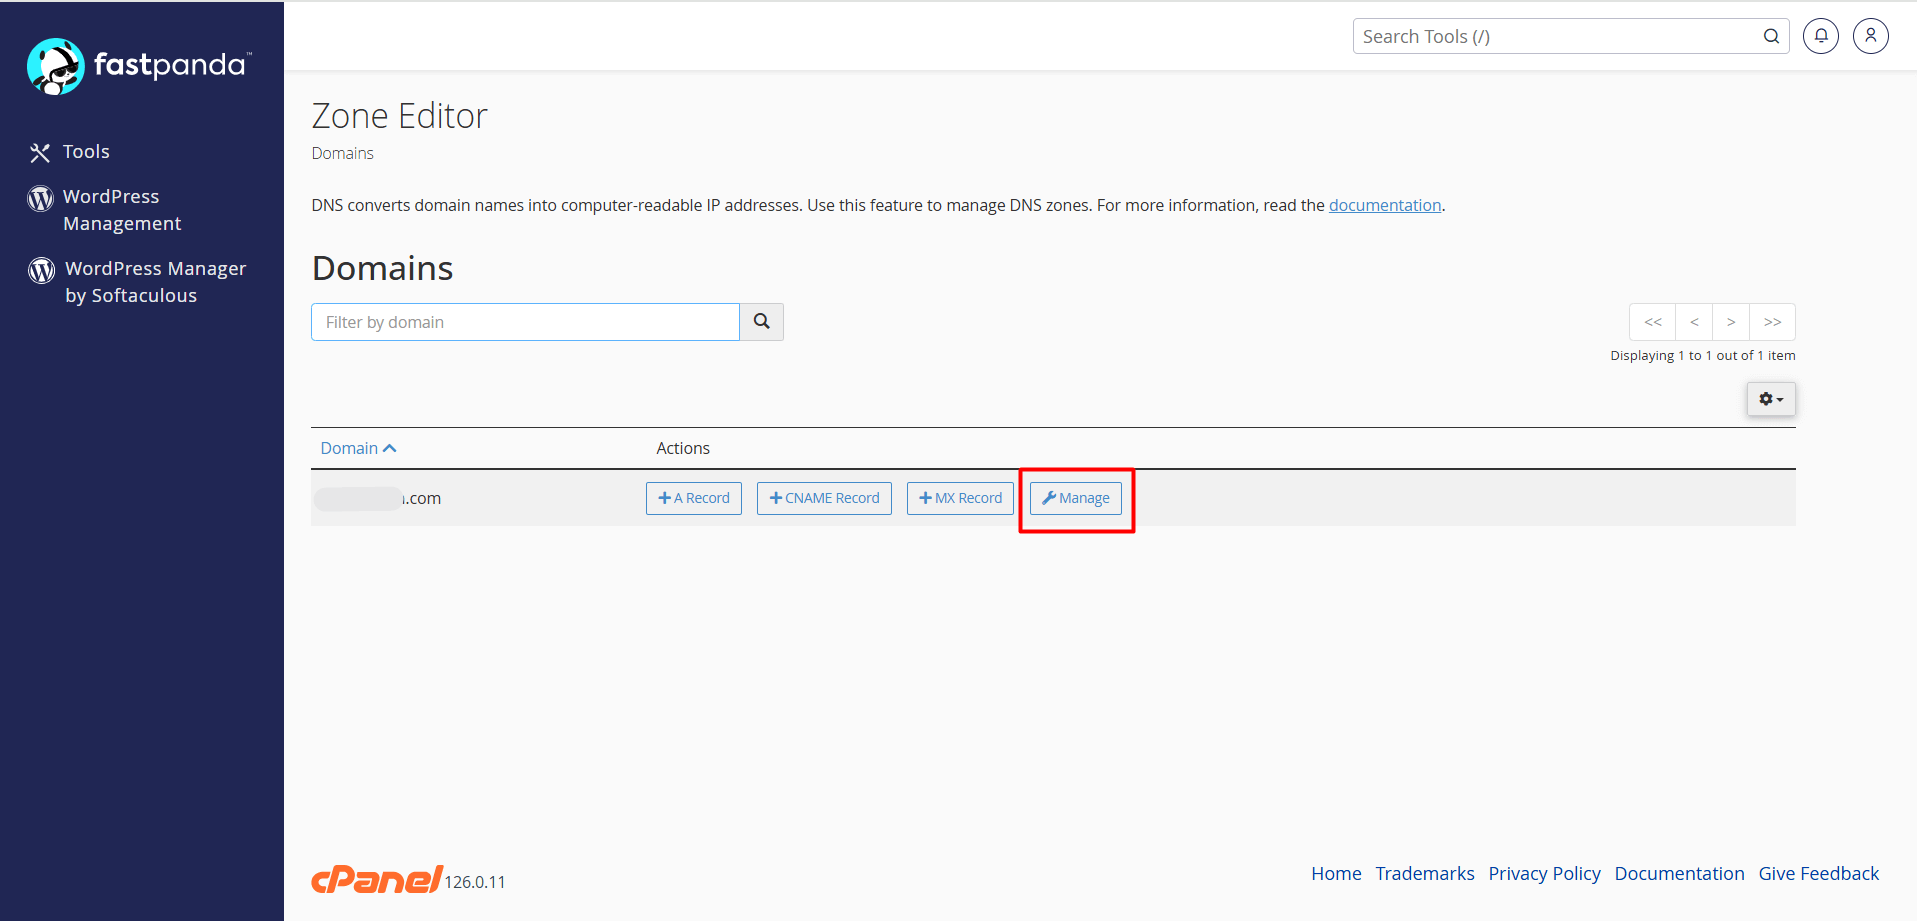
- Click the “Manage” button next to your domain name.
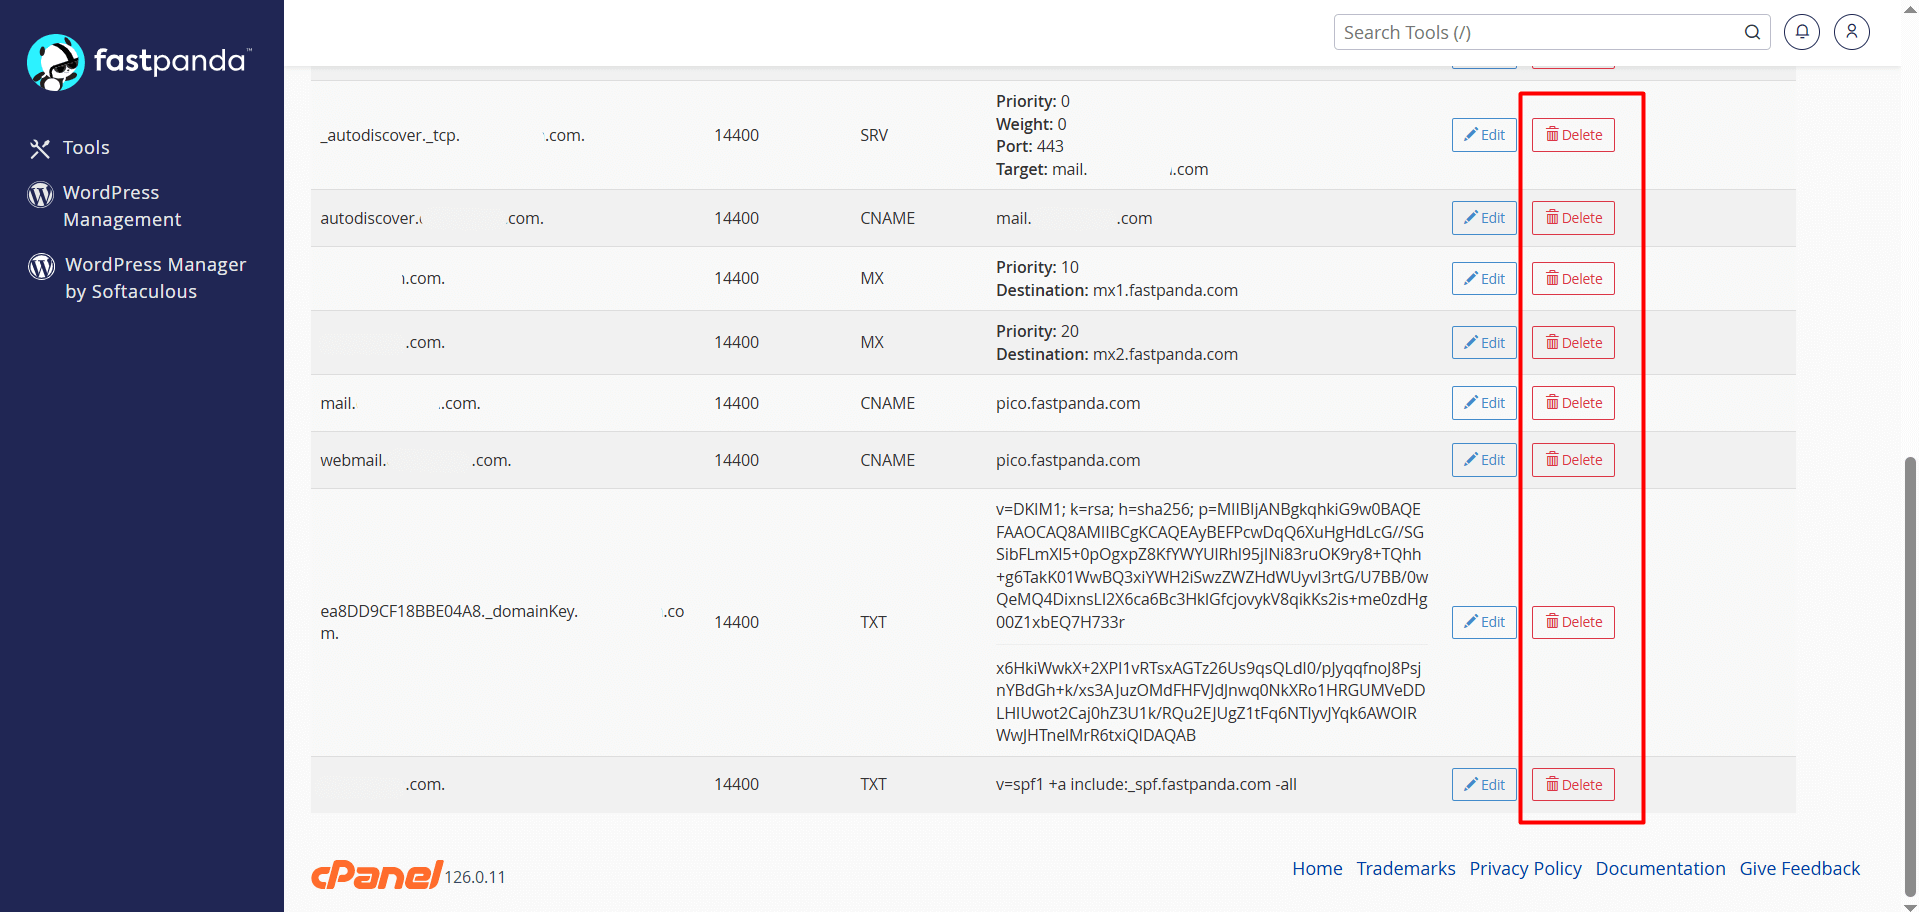
- On the page that opens, you will see your existing DNS records. If there are any existing records with the same type and name combinations as the new email records you are about to add, it is recommended to delete them to avoid conflicts. However, if you are not experienced in this area, it’s best to consult a specialist or get support from our technical team to avoid making any mistakes.
- To delete an old record, you can click the “Delete > Continue” button next to the record.
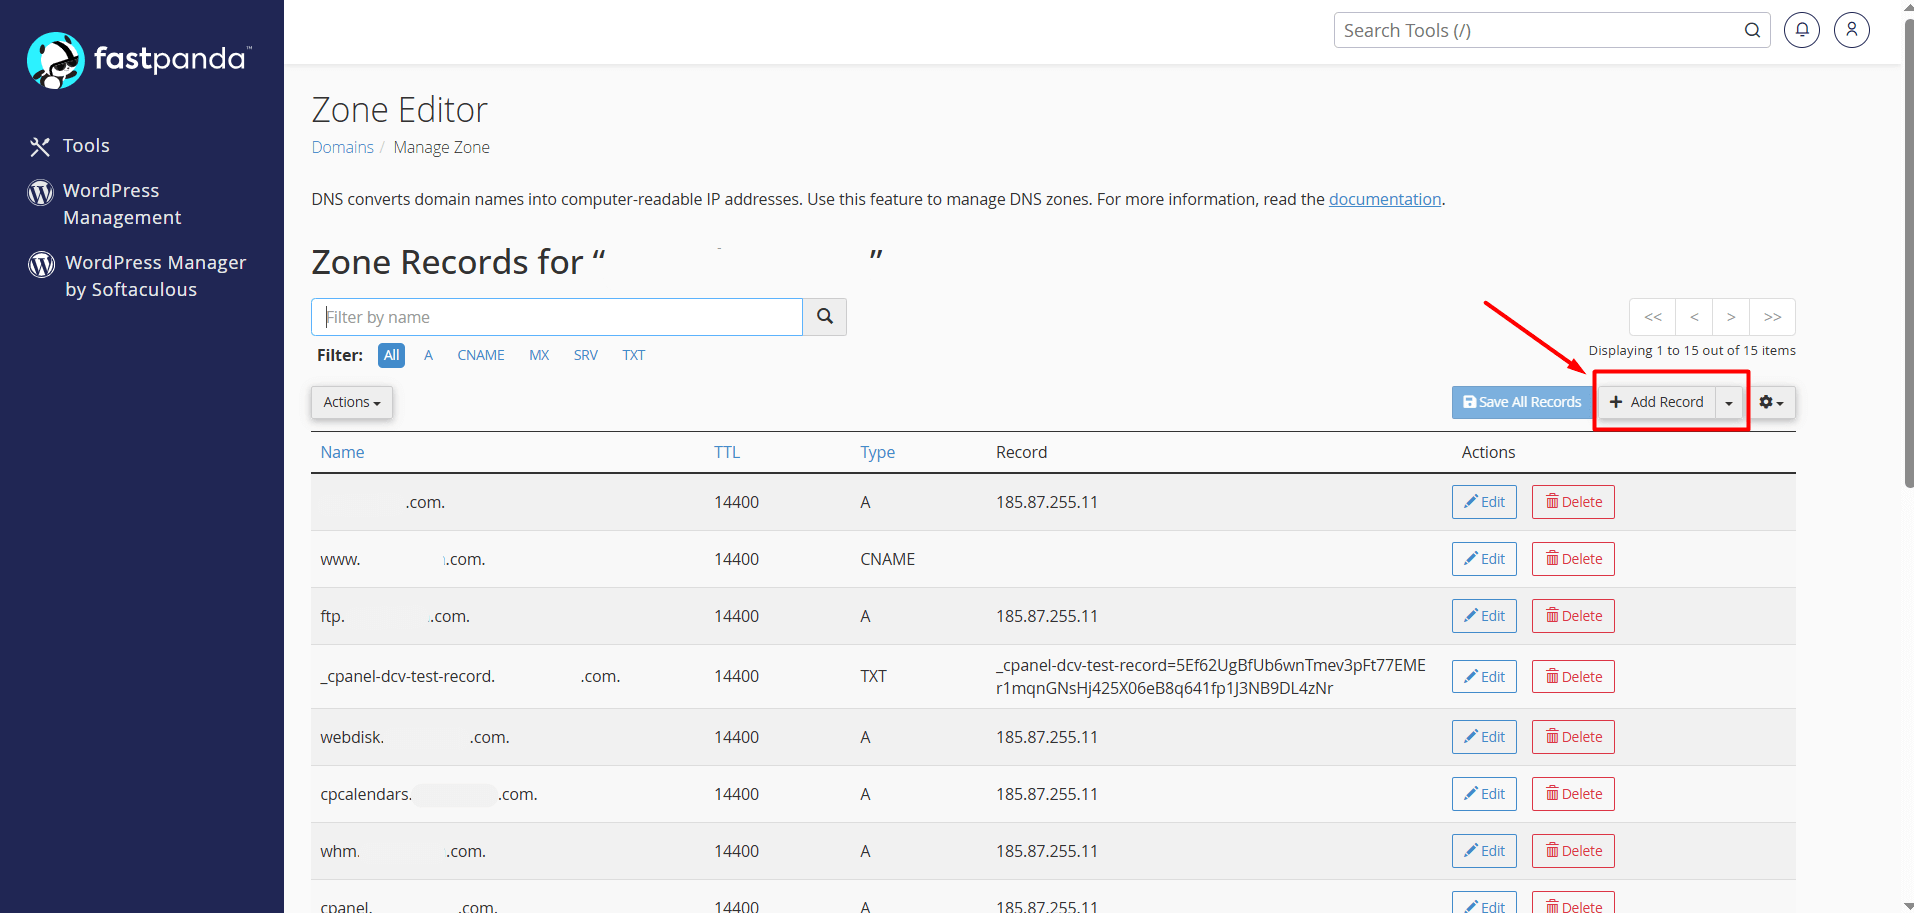
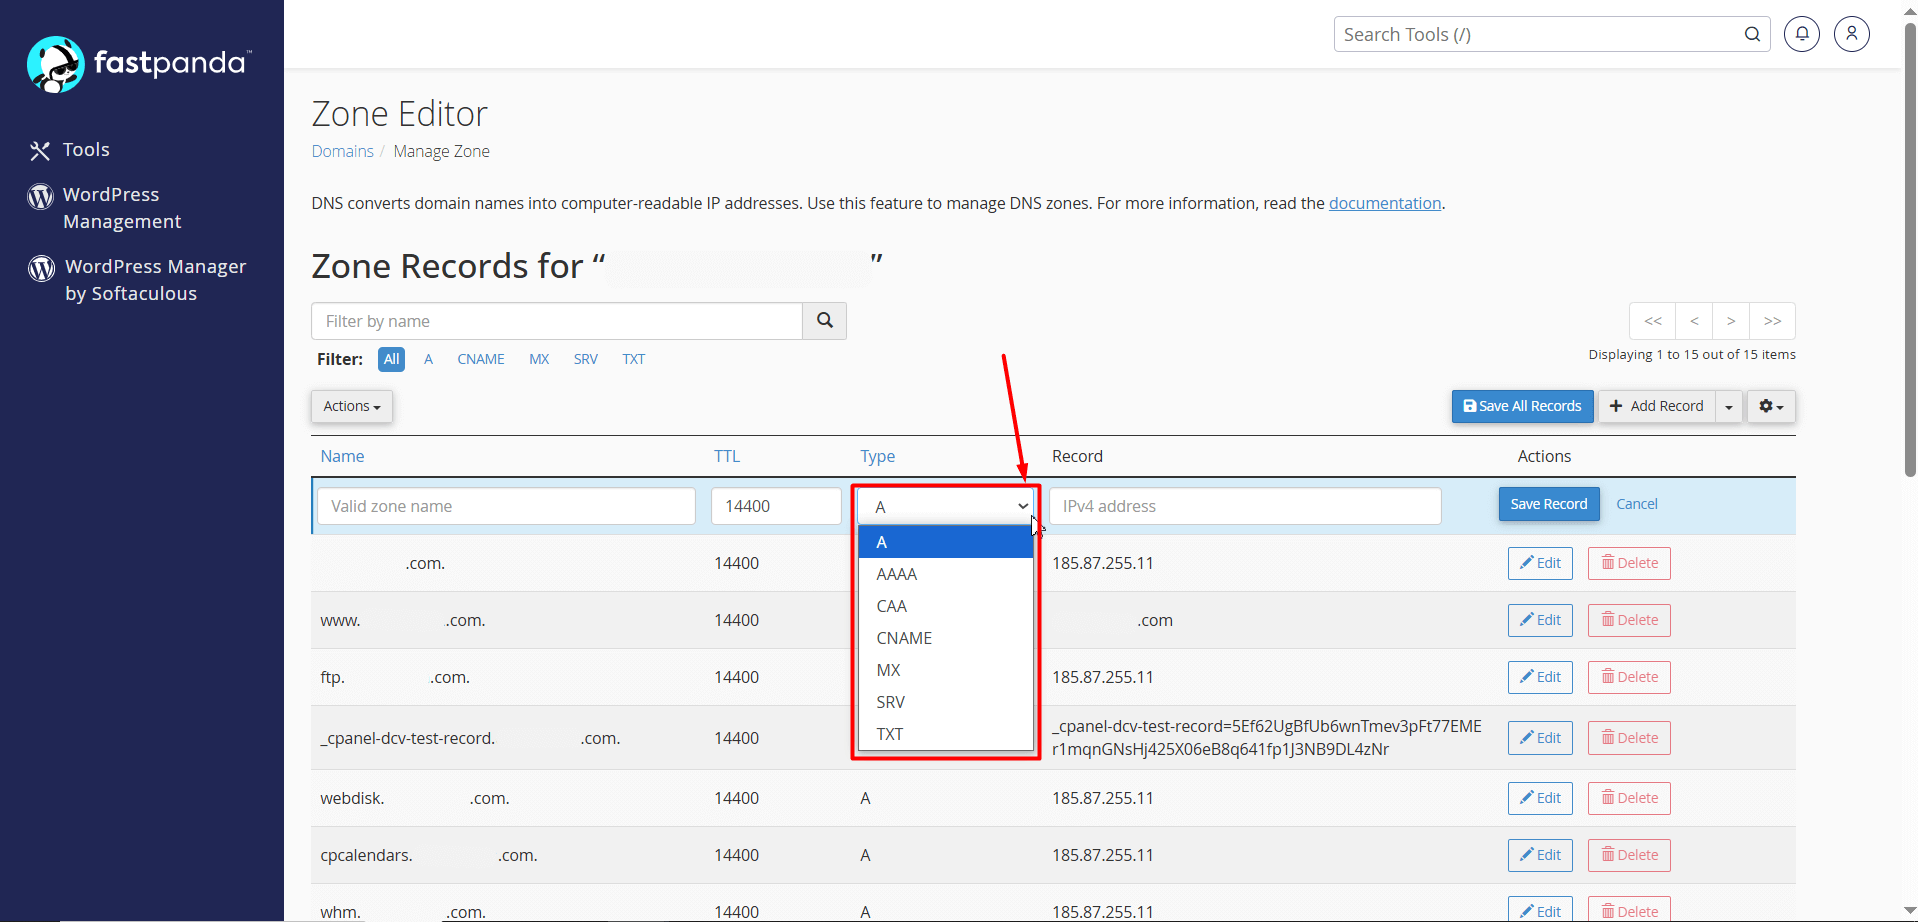
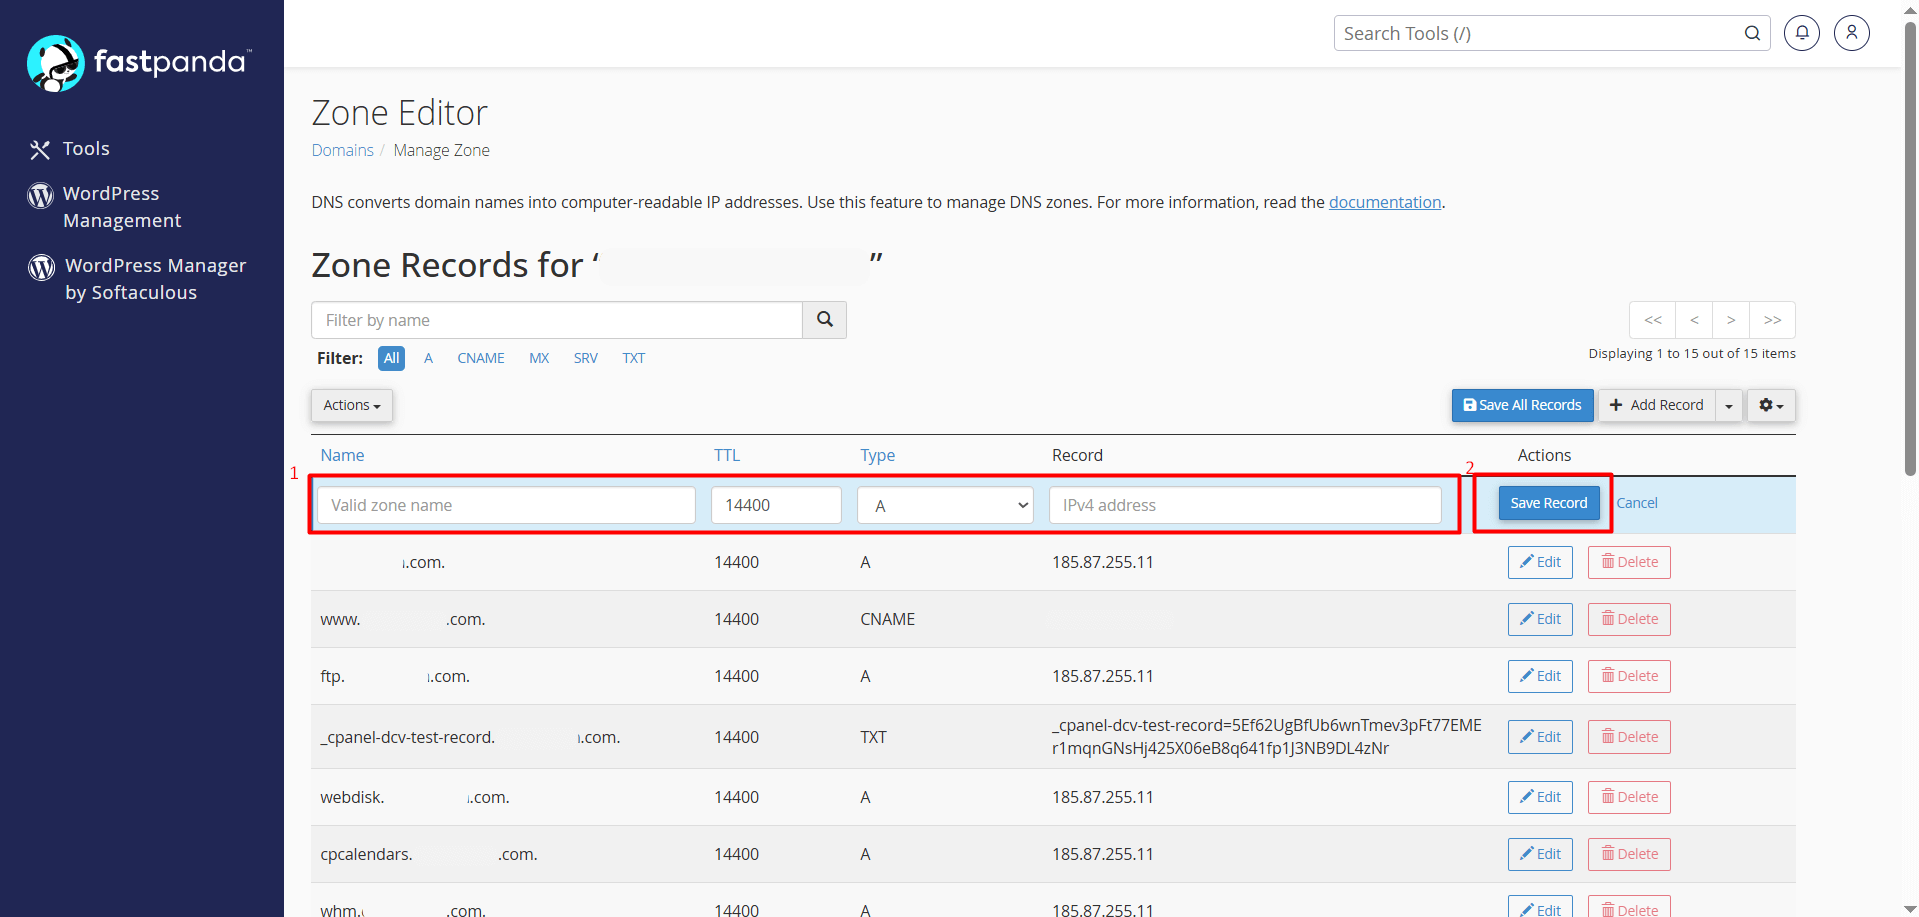
- To add a new record, click the “+ Add Record” button.
- In the “Type” field of the opened section, select the type of record you want to add. (MX, CNAME, TXT, etc.)
- Enter the Business Email Hosting DNS information one by one. If you are sure the information is correct, click the “Save Record” button.
Example: In the Business Email Hosting > DNS Information, the first record is an MX record.
| Name | Type | Priority | Target |
| yourdomain.com. | MX | 10 | mx1.fastpanda.com |
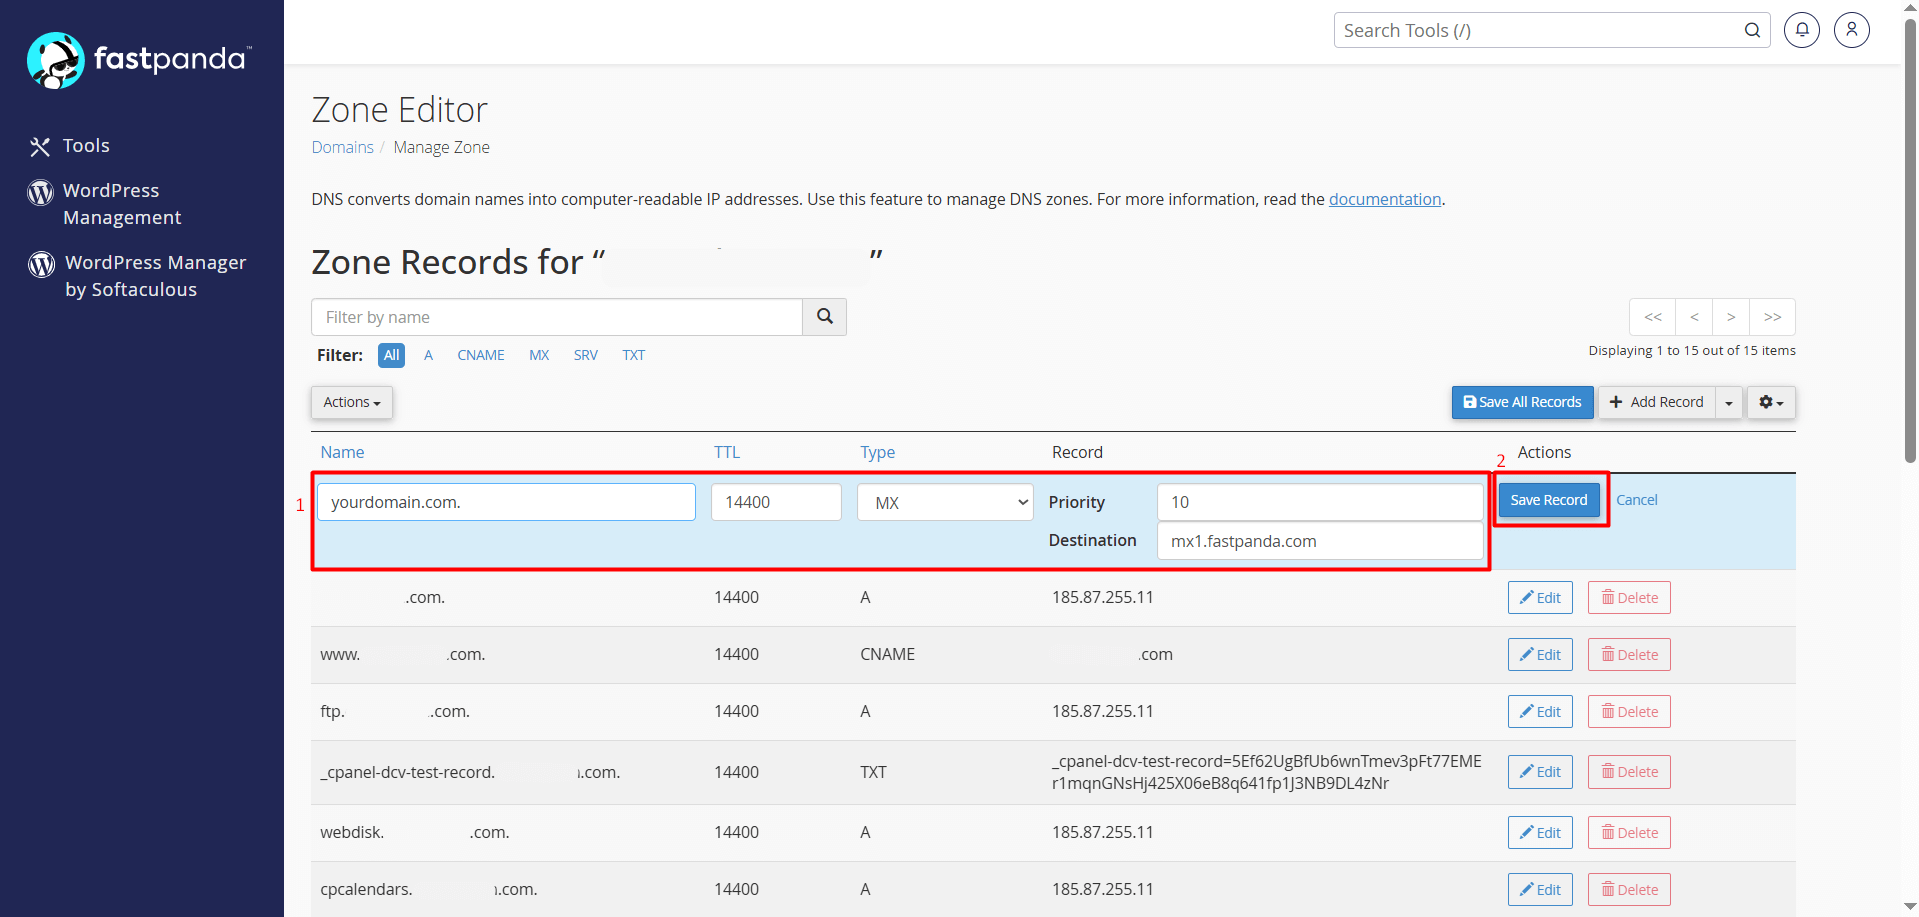
- In cPanel Zone Editor, click on “+ Add Record” and select “Type > MX.”
- In the “Name” box, enter yourdomain.extension. (your own domain).
- The TTL value should be left as default.
- In the “Priority” box, enter “10” since the Business Email Hosting > DNS Information section specifies 10.
- In the “Destination” box, enter the target value, which is mx1.fastpanda.com
- If you are sure the records are correct, click the “Save Record” button.
After adding the first record, proceed to the second record. On the Business Email Hosting > DNS Information page, the second record is also an MX record.
| Name | Type | Priority | Target |
| yourdomain.com. | MX | 20 | mx2.fastpanda.com |
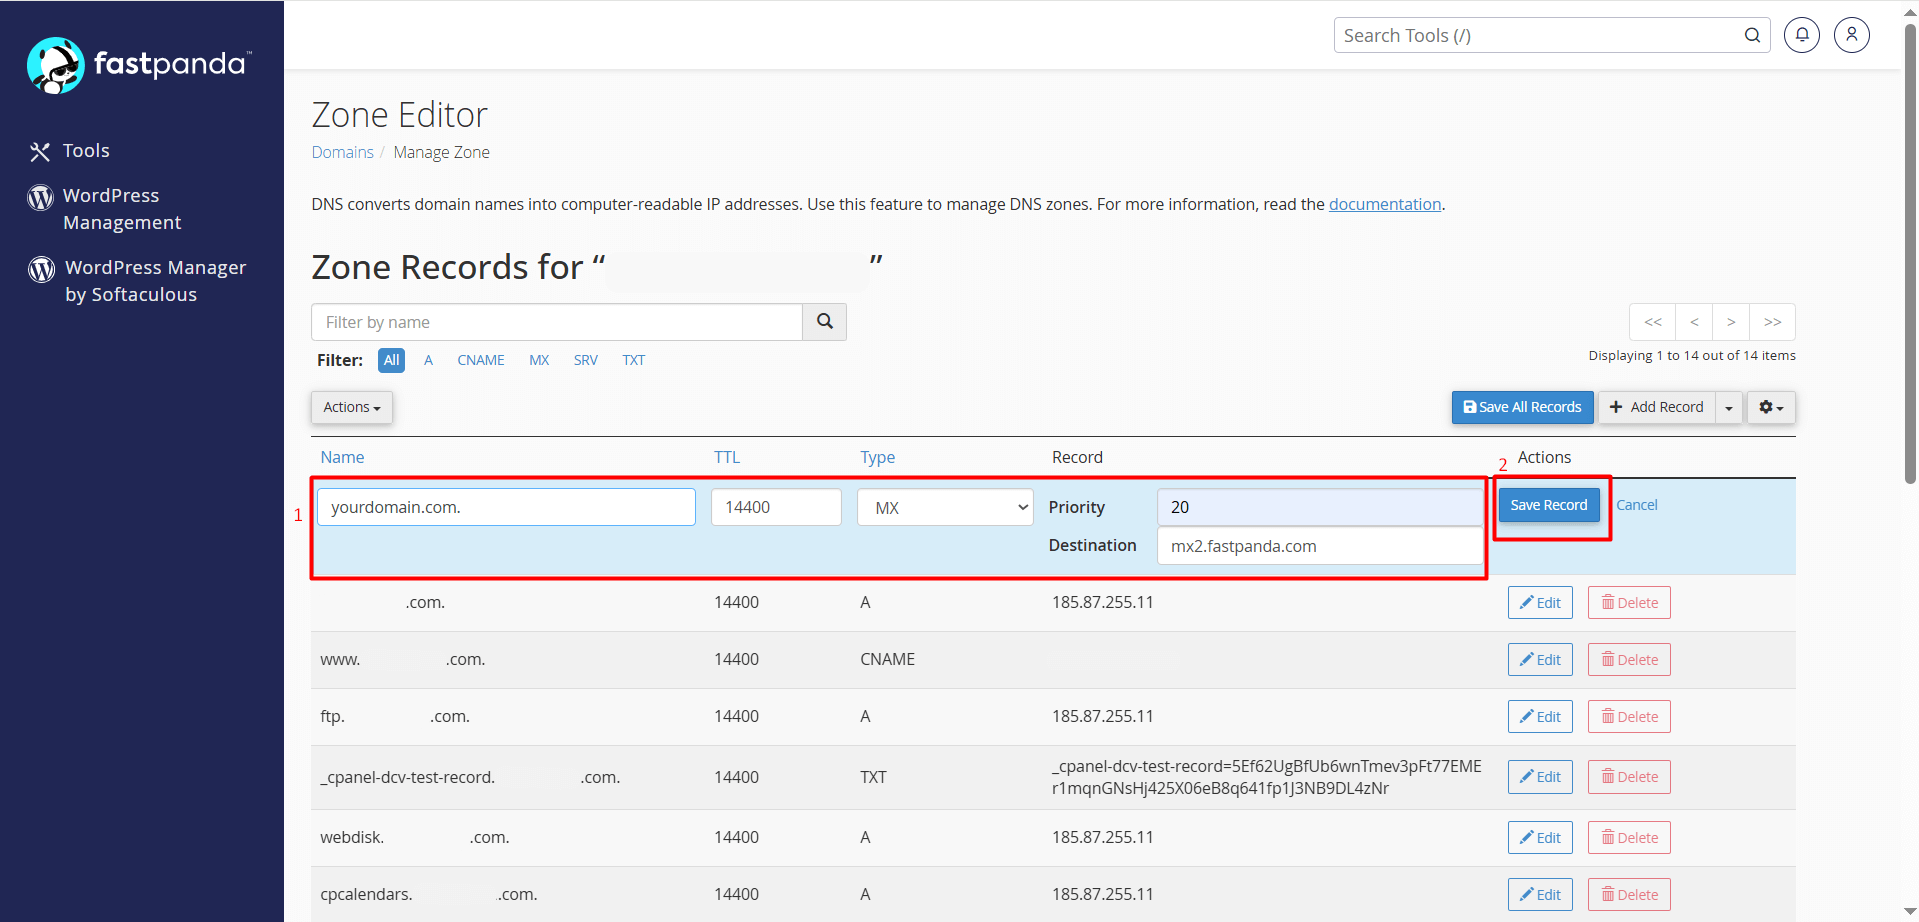
- In cPanel Zone Editor, click on “+ Add Record” and select “Type > MX.”
- In the “Name” box, enter yourdomain.extension. (your own domain).
- The TTL value should be left as default.
- In the “Priority” box, enter “20” since the Business Email Hosting > DNS Information section specifies 20.
- In the “Destination” box, enter the target value, which is mx2.fastpanda.com
- If you are sure the records are correct, click the “Save Record” button.
The third record on the Business Email Hosting > DNS Information page is a CNAME record.
| Name | Type | Priority | Target |
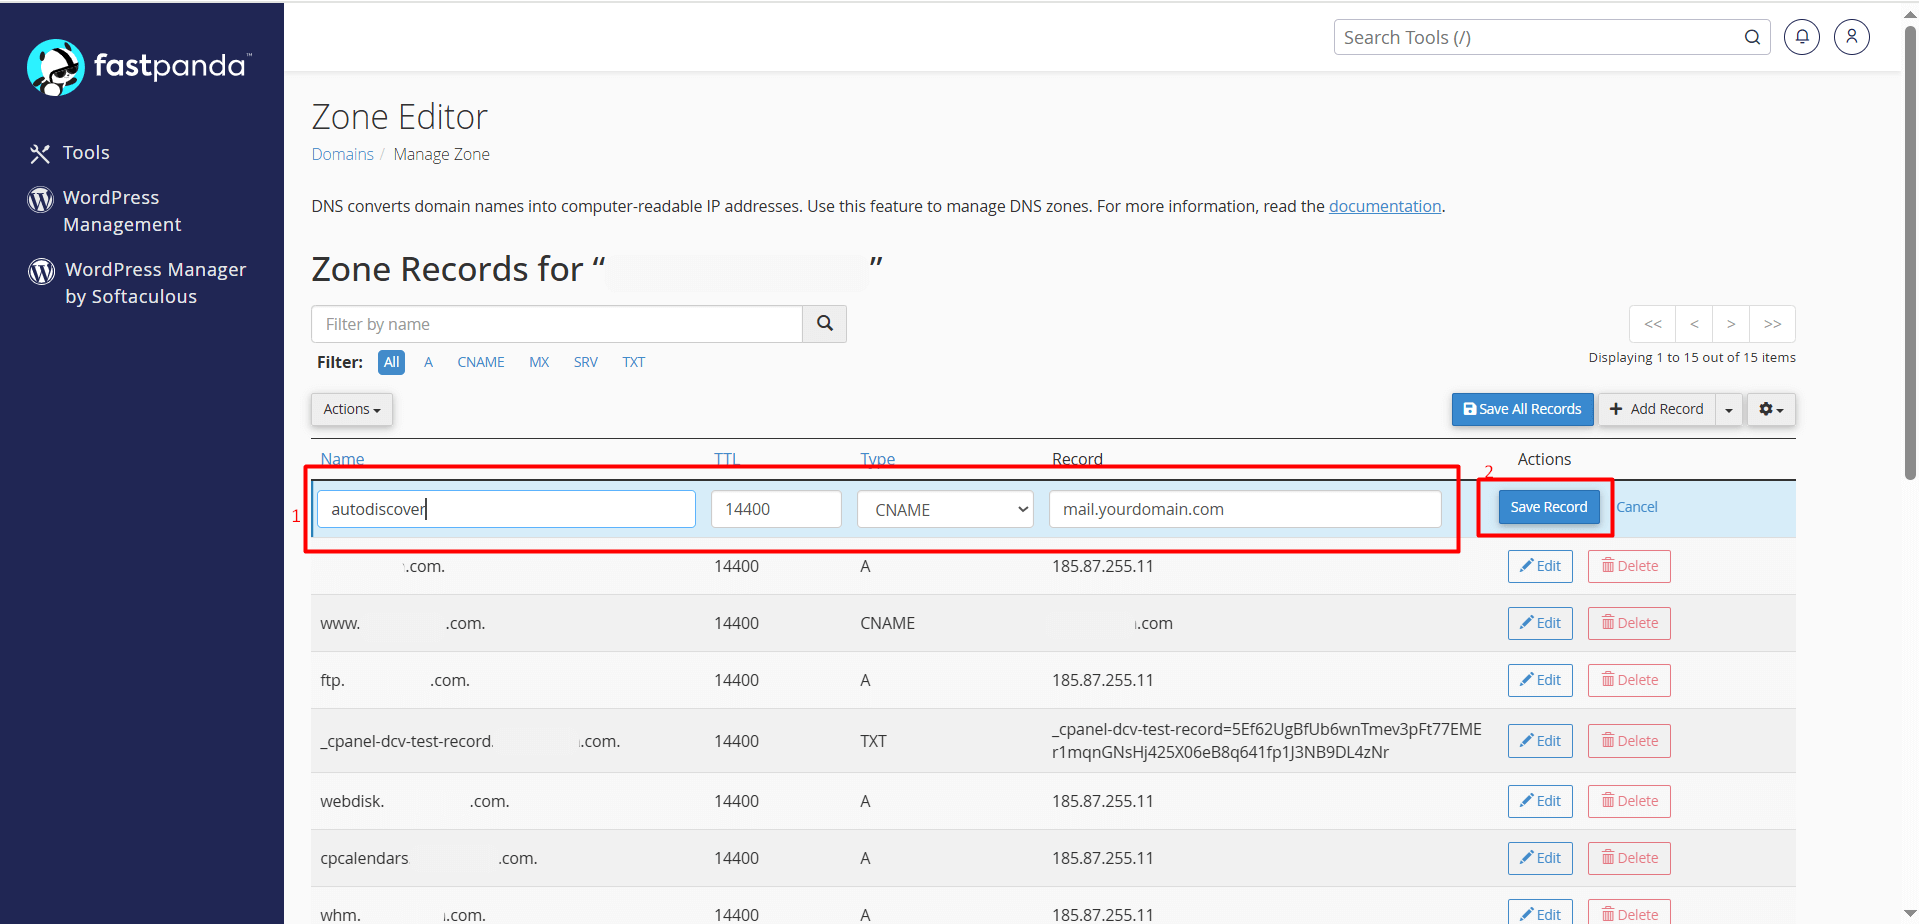
| autodiscover | CNAME | mail.yourdomain.com. |
- In cPanel Zone Editor, click on “+ Add Record” and select “Type > CNAME.”
- In the “Name” field, enter “autodiscover”. (The system will automatically append your domain name next to it — do not delete it.)
- The TTL value should be left as default.
- In the “Record” field, enter mail.yourdomain.com.
- If you are sure the records are correct, click the “Save Record” button.
The fourth record on the Business Email Hosting > DNS Information page is a CNAME record.
| Name | Type | Priority | Target |
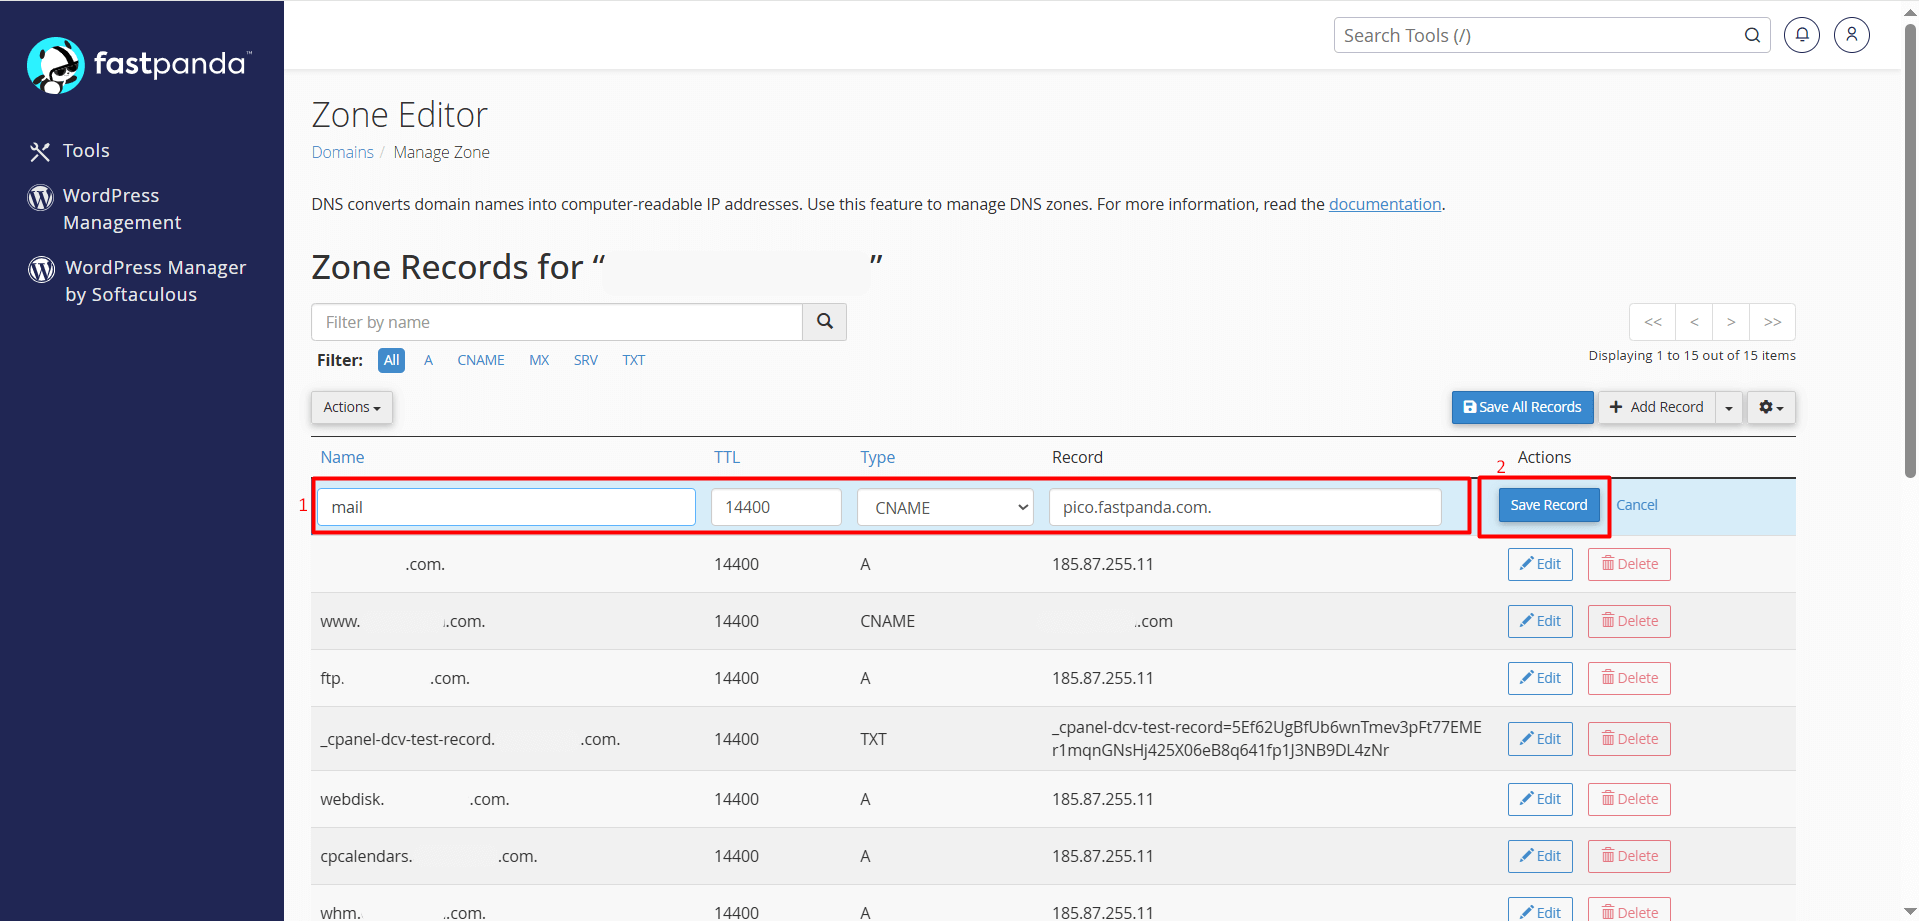
| CNAME | pico.fastpanda.com. |
- In cPanel Zone Editor, click on “+ Add Record” and select “Type > CNAME.”
- In the “Name” field, enter “mail”. (The system will automatically append your domain name next to it — do not delete it.)
- The TTL value should be left as default.
- In the “Record” field, enter pico.fastpanda.com.
- If you are sure the records are correct, click the “Save Record” button.
The fifth record on the Business Email Hosting > DNS Information page is a CNAME record.
| Name | Type | Priority | Target |
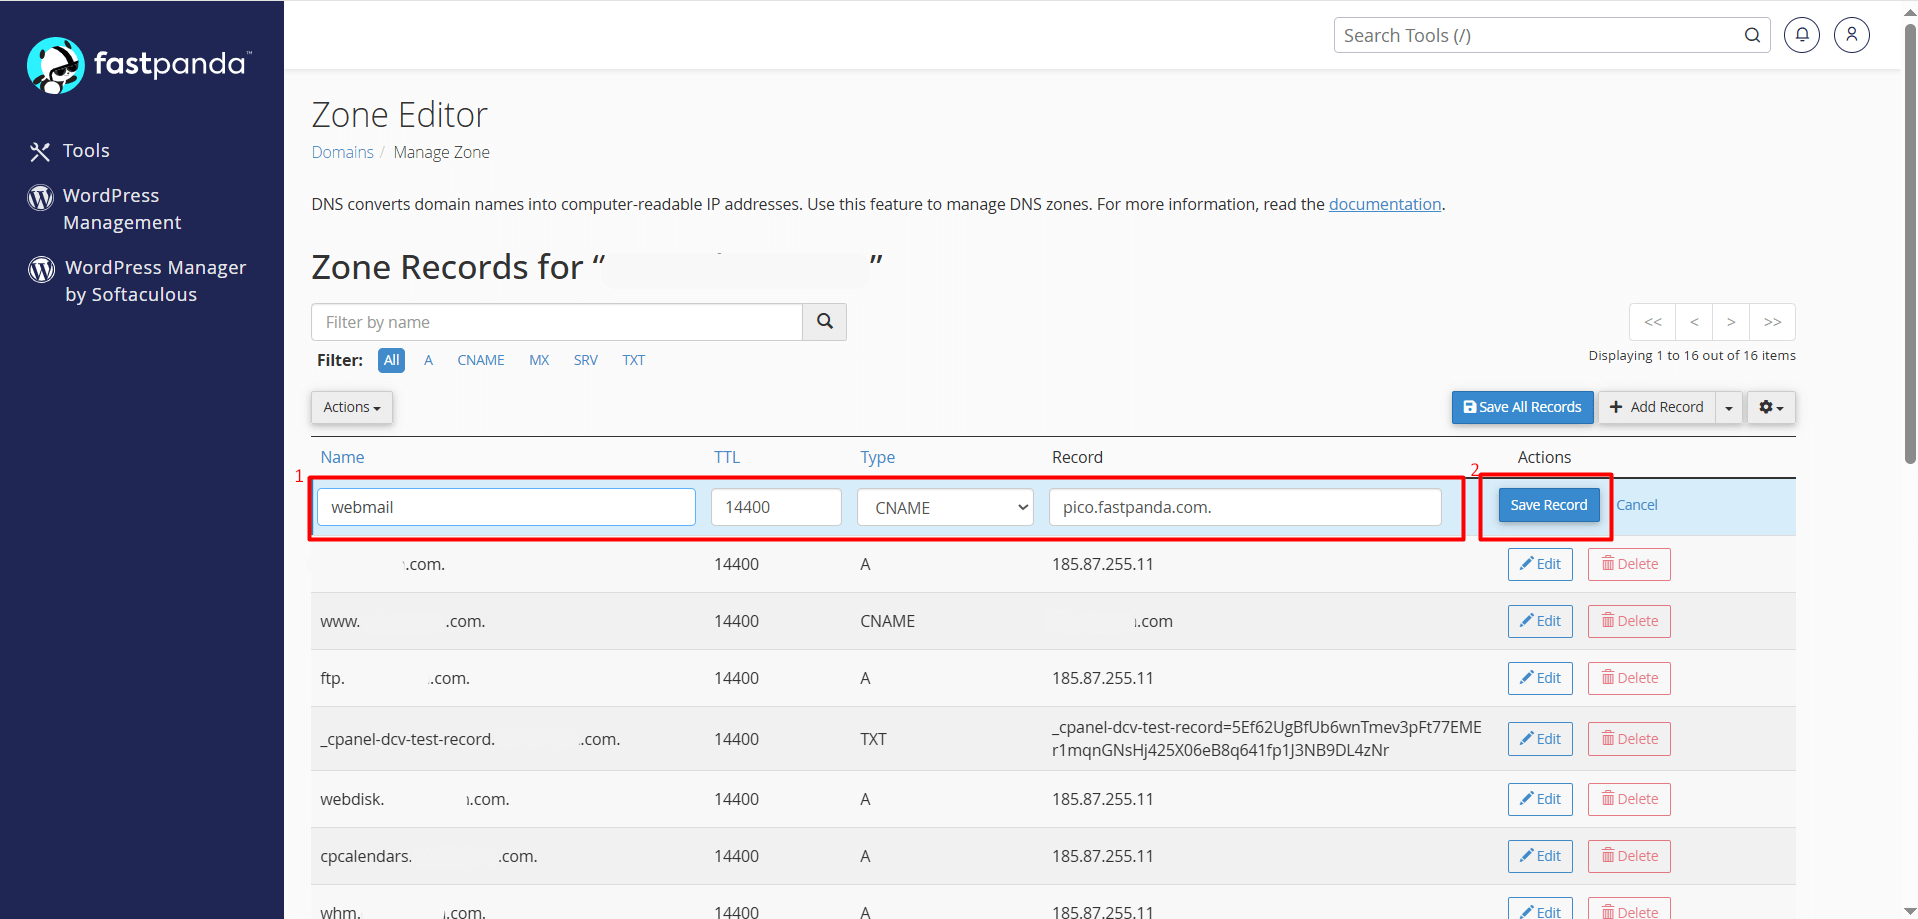
| webmail | CNAME | pico.fastpanda.com. |
- In cPanel Zone Editor, click on “+ Add Record” and select “Type > CNAME.”
- In the “Name” field, enter “webmail”. (The system will automatically append your domain name next to it — do not delete it.)
- The TTL value should be left as default.
- In the “Record” field, enter pico.fastpanda.com.
- If you are sure the records are correct, click the “Save Record” button.
The sixth record on the Business Email Hosting > DNS Information page is a TXT record.
| Name | Type | Priority | Target |
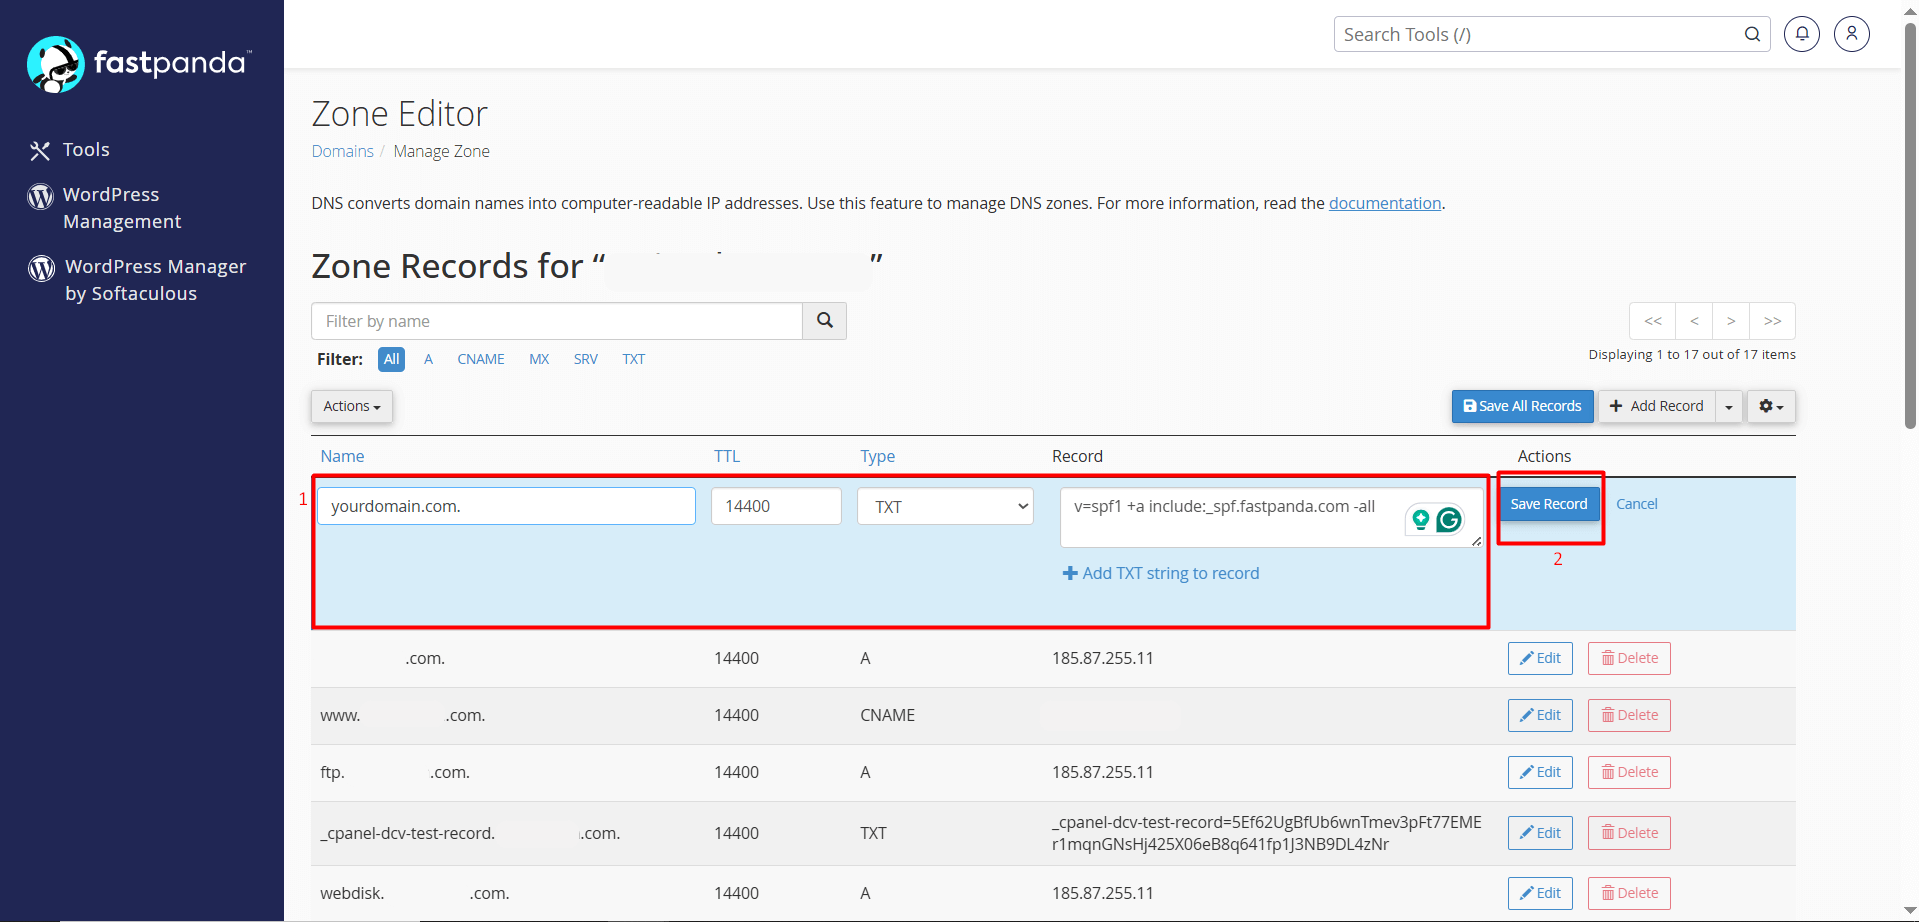
| yourdomain.com. | TXT | v=spf1 +a include:_spf.fastpanda.com -all |
- In cPanel Zone Editor, click on “+ Add Record” and select “Type > TXT.”
- In the “Name” box, enter yourdomain.extension. (your own domain).
- The TTL value should be left as default.
- In the “Record” field, enter v=spf1 +a include:_spf.fastpanda.com -all
- If you are sure the records are correct, click the “Save Record” button.
The seventh record on the Business Email Hosting > DNS Information page is an SRV record.
| Name | Type | Priority | Target |
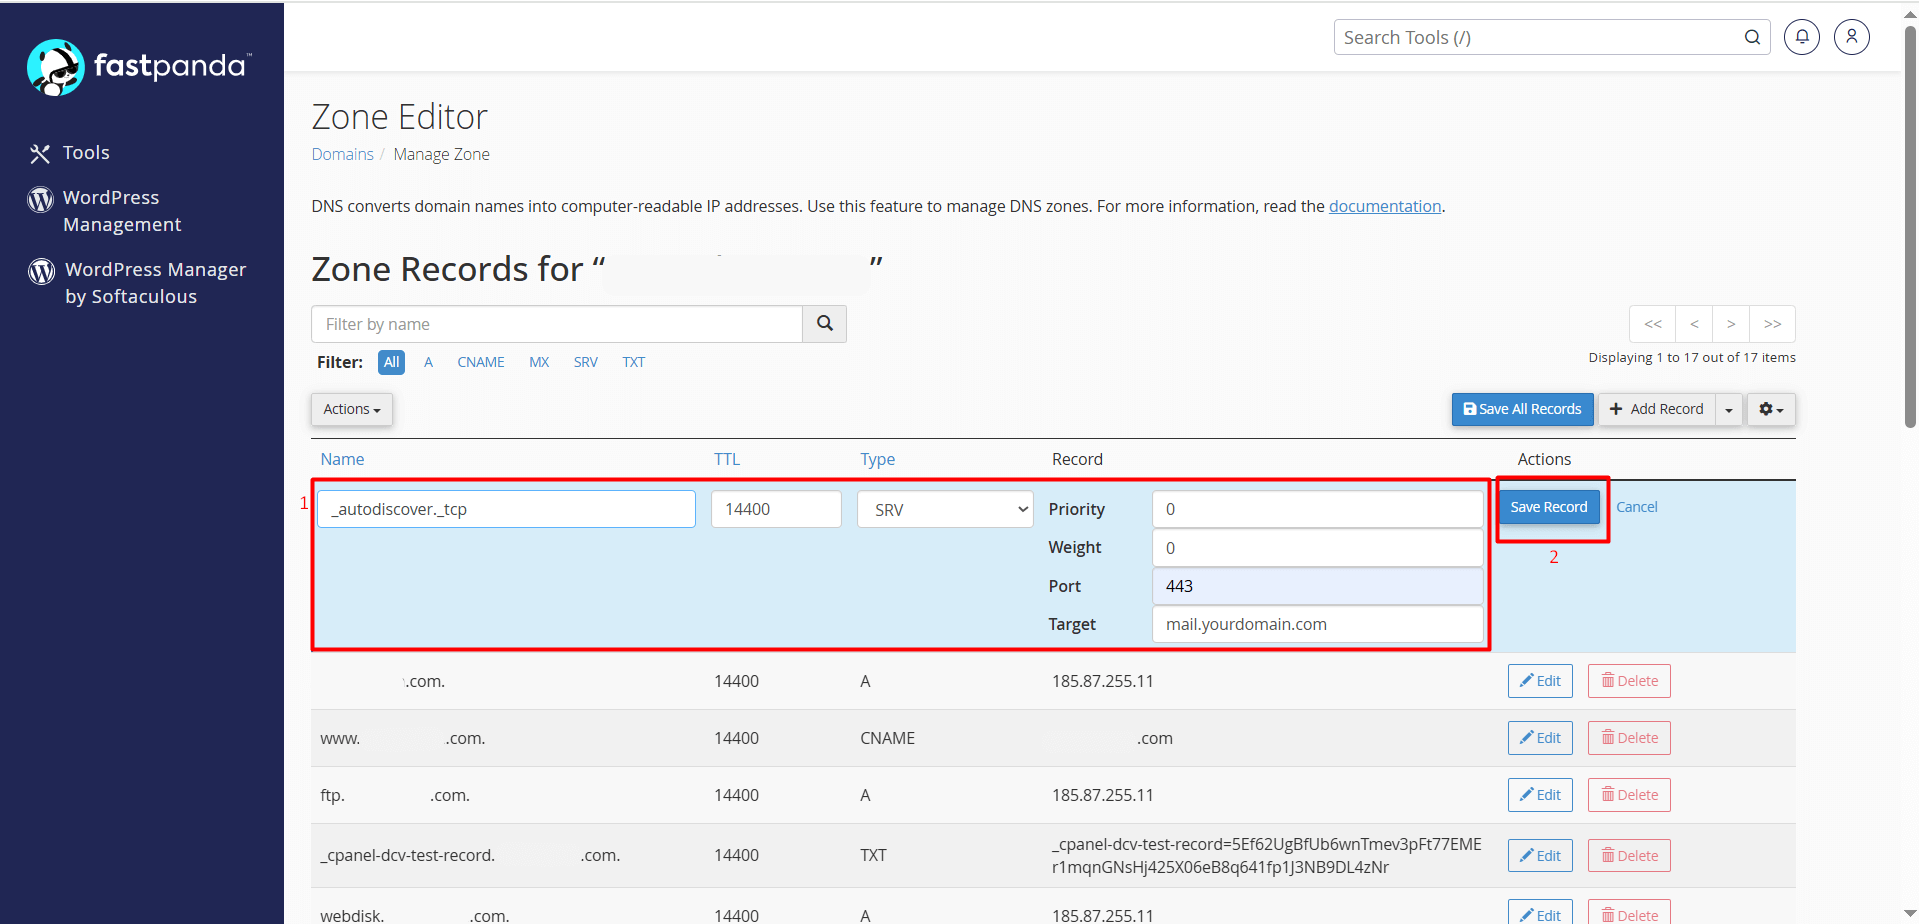
| _autodiscover._tcp | SRV | 0 | Service: _autodiscover Protocol: TCP Priority: 0 Weight: 0 Port: 443 Target: mail.yourdomain.com. |
- In cPanel Zone Editor, click on “+ Add Record” and select “Type > SRV.”
- In the “Name” box, enter _autodiscover._tcp (The system will automatically append your domain name next to it — do not delete it.)
- The TTL value should be left as default.
- Priority: 0
- Weight:0
- Port:443
- If you are sure the records are correct, click the “Save Record” button.
The eighth record on the Business Email Hosting > DNS Information page is a TXT record.
| Name | Type | Priority | Target |
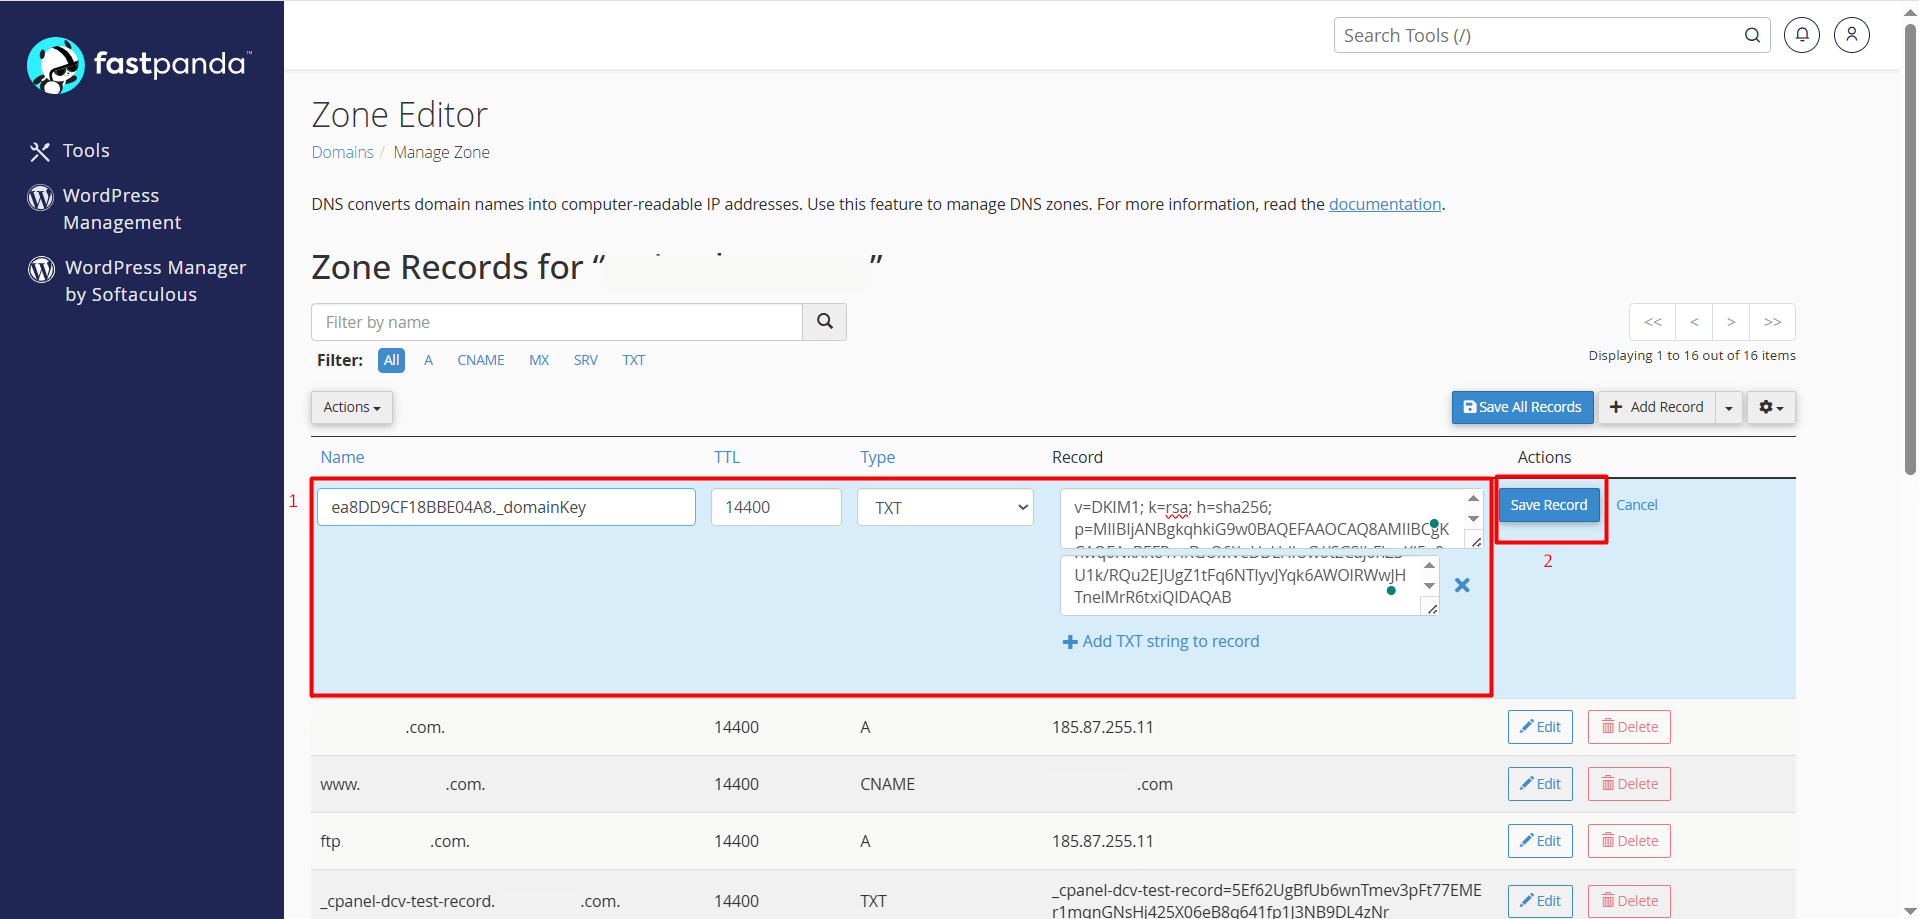
| ea8DD9CF18BBE04A8._domainKey | TXT | v=DKIM1; k=rsa; h=sha256; p=MIIBIjANBgkqhkiG9w0 BAQEFAAOCAQ8AMIIBCgKCAQEAyBEFPcwDqQ6Xu HgHdLcG//SGSibFLmXl5+0pOgxpZ8KfYWYUlRhl95jIN i83ruOK9ry8+TQhh+g6TakK01WwBQ3xiYWH2iSwzZ WZHdWUyvI3rtG/U7BB/0wQeMQ4DixnsLI2X6ca6B c3HklGfcjovykV8qikKs2is+me0zdHg00Z1xbEQ7H733 rx6HkiWwkX+2XPI1vRTsxAGTz26Us9qsQLdI0/pJyq qfnoJ8PsjnYBdGh+k/xs3AJuzOMdFHFVJdJnwq0NkX Ro1HRGUMVeDDLHIUwot2Caj0hZ3U1k/RQu2EJUgZ 1tFq6NTlyvJYqk6AWOIRWwJHTnelMrR6txiQIDAQAB |
- In cPanel Zone Editor, click on “+ Add Record” and select “Type > TXT.”
- In the “Name” box, enter ea8DD9CF18BBE04A8._domainKey (The system will automatically append your domain name next to it — do not delete it.)
- The TTL value should be left as default.
- In the “Record” field, enter v=DKIM1; k=rsa; h=sha256; p=MIIBIjANBgkqhkiG9w0BAQEFAAOCAQ8AMIIBCgKCAQEAyBEFPcwDqQ6XuHgHdLcG//SGSibFLmX
l5+0pOgxpZ8KfYWYUlRhl95jINi83ruOK9ry8+TQhh+g6TakK01WwBQ3xiYWH2iSwzZWZHdWUyvI3rtG/U
7BB/0wQeMQ4DixnsLI2X6ca6Bc3HklGfcjovykV8qikKs2is+me0zdHg00Z1xbEQ7H733rx6HkiWwkX+2XPI
1vRTsxAGTz26Us9qsQLdI0/pJyqqfnoJ8PsjnYBdGh+k/xs3AJuzOMdFHFVJdJnwq0NkXRo1HRGUMVeDDL
HIUwot2Caj0hZ3U1k/RQu2EJUgZ1tFq6NTlyvJYqk6AWOIRWwJHTnelMrR6txiQIDAQAB
Important Information: Since the DKIM record is a long string, it cannot be added to cPanel in a single entry. A portion of it should be entered into the first TXT field, and the remainder should be added into the additional TXT field that appears after clicking the “+ Add TXT string to record” button. - If you are sure the records are correct, click the “Save Record” button.
If you have added all the records completely and correctly, it may take up to approximately 24 hours for the records to propagate globally. After this process, you will be able to use your emails smoothly.
Note: Records may vary. Please make sure to check all records directly from your own customer panel.


 .CO.UK Domain
 Linux Hosting
 Windows Hosting