If you have purchased only a domain name and Business Email Hosting service through FastPanda, and you’re not sure how to configure your mail records, you can follow the steps below.
If you have accessed your DNS records, what you need to do now is add these records one by one to the DNS Zone Management area. To access the page where DNS records can be added and to add the records, you can follow the steps below.
- Access the website www.fastpanda.co.uk
- Click on the “Sign In” button on the opened page, enter your customer panel information, and click the “Log in” button to log in to your account.
- Click on the “Domain Names” option in the left menu.
- On the opened page, you will see a list of domain names you own. Click on the “pencil” symbol next to the domain name for which you want to update the DNS records.
- Click on the “Domain Park > DNS Zone Management” button from the menu on the right side of the page.
- If the domain parking service is not active, you need to activate it first. If you encounter a screen like the one below, click on the “Enable Domain Parking” button.
Note: If your domain’s NS records point to a different provider, activating the parking page will reset all your existing records. Any active services will stop working. You will need to re-add your website’s A record, WWW, and other records through the DNS zone management area. Additionally, your domain’s NS records will be updated as shown below.
p1.fastpanda.com
p2.fastpanda.com
- After activating the DNS parking service, click again on the “Domain Park > DNS Zone Management” button from the menu on the right side of the page.
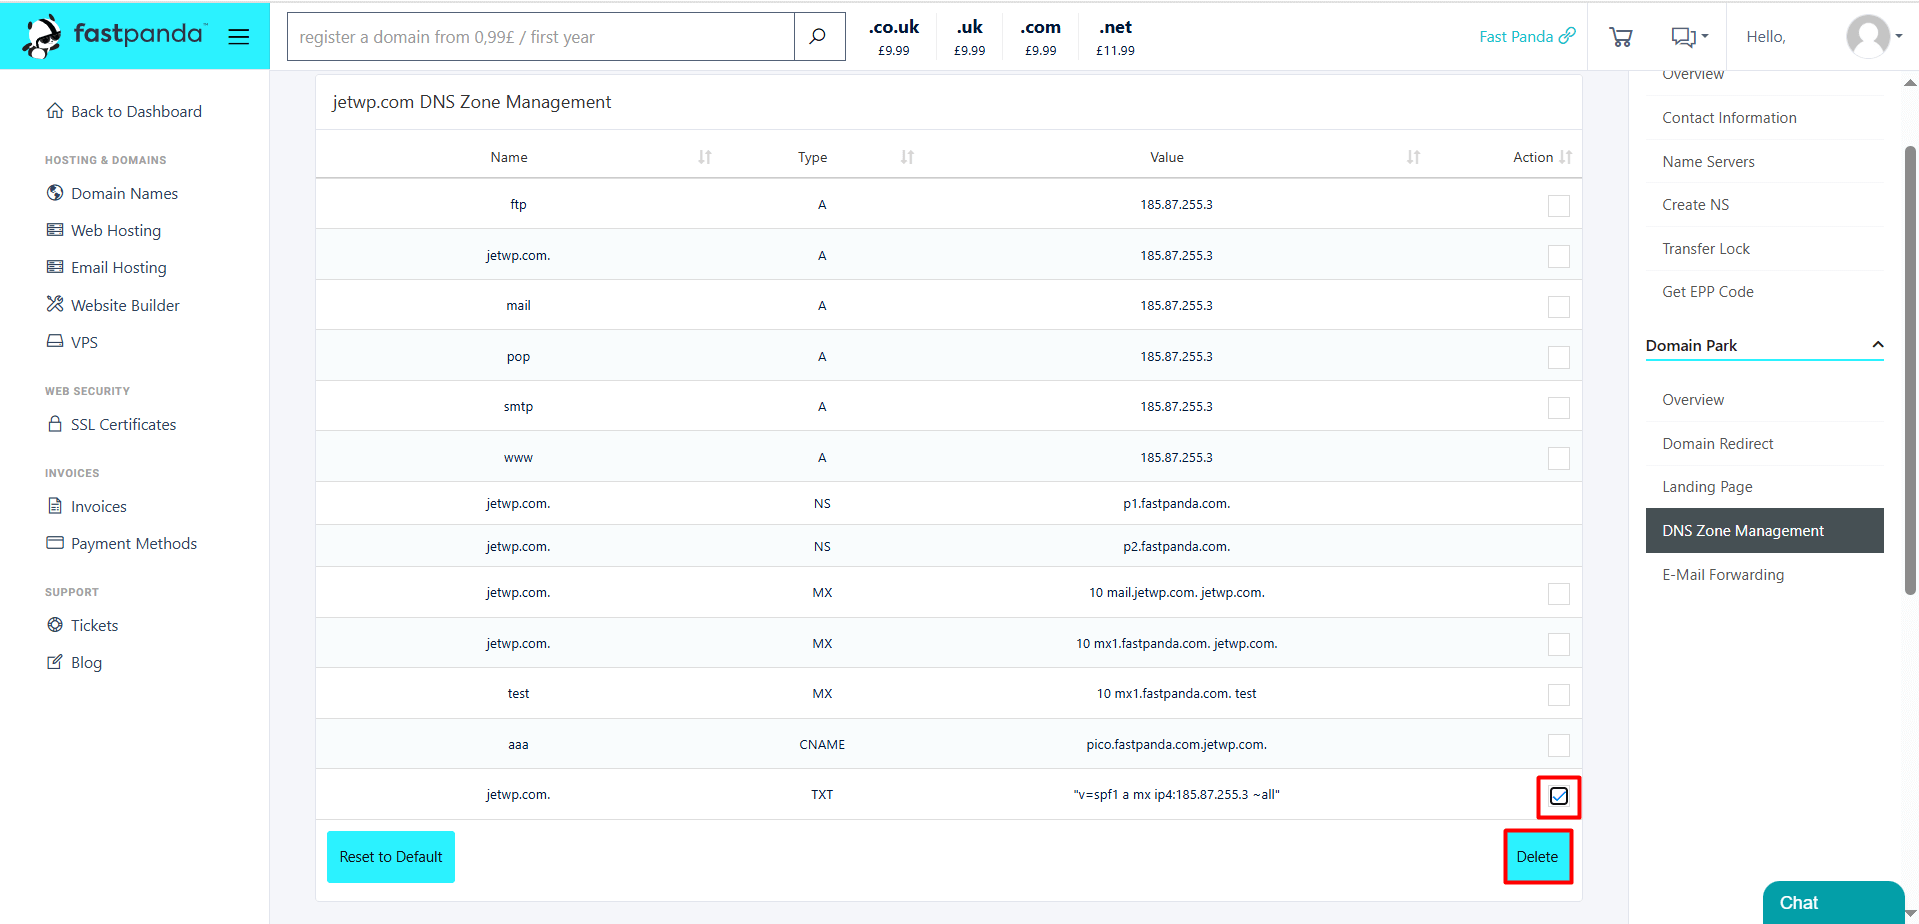
- On the page that opens, you will see your existing DNS records. If there are any existing records with the same type and name combinations as the new email records you are about to add, it is recommended to delete them to avoid conflicts. However, if you are not experienced in this area, it’s best to consult a specialist or get support from our technical team to avoid making any mistakes.
- To delete an old record, check (tick) the box next to the record, then click the “Delete > Ok” button.
- Access the “Add DNS Record” section.
- Enter the Business Email Hosting DNS information one by one.
- Click the “Save” button. For the records you are unable to add on the screen (such as SRV), you can contact our support team for assistance.
Example: In the Business Email Hosting > DNS Information, the first record is an MX record.
| Name | Type | Priority | Target |
| yourdomain.com. | MX | 10 | mx1.fastpanda.com. |
- In the “Name” box, enter yourdomain.extension. (your own domain).
- In the “Priority” box, enter “10” since the Business Email Hosting > DNS Information section specifies 10.
- In the “Value” box, enter the target value, which is mx1.fastpanda.com. (A dot must be added at the end of the record.)
- If you are sure the records are correct, click the “Save” button.
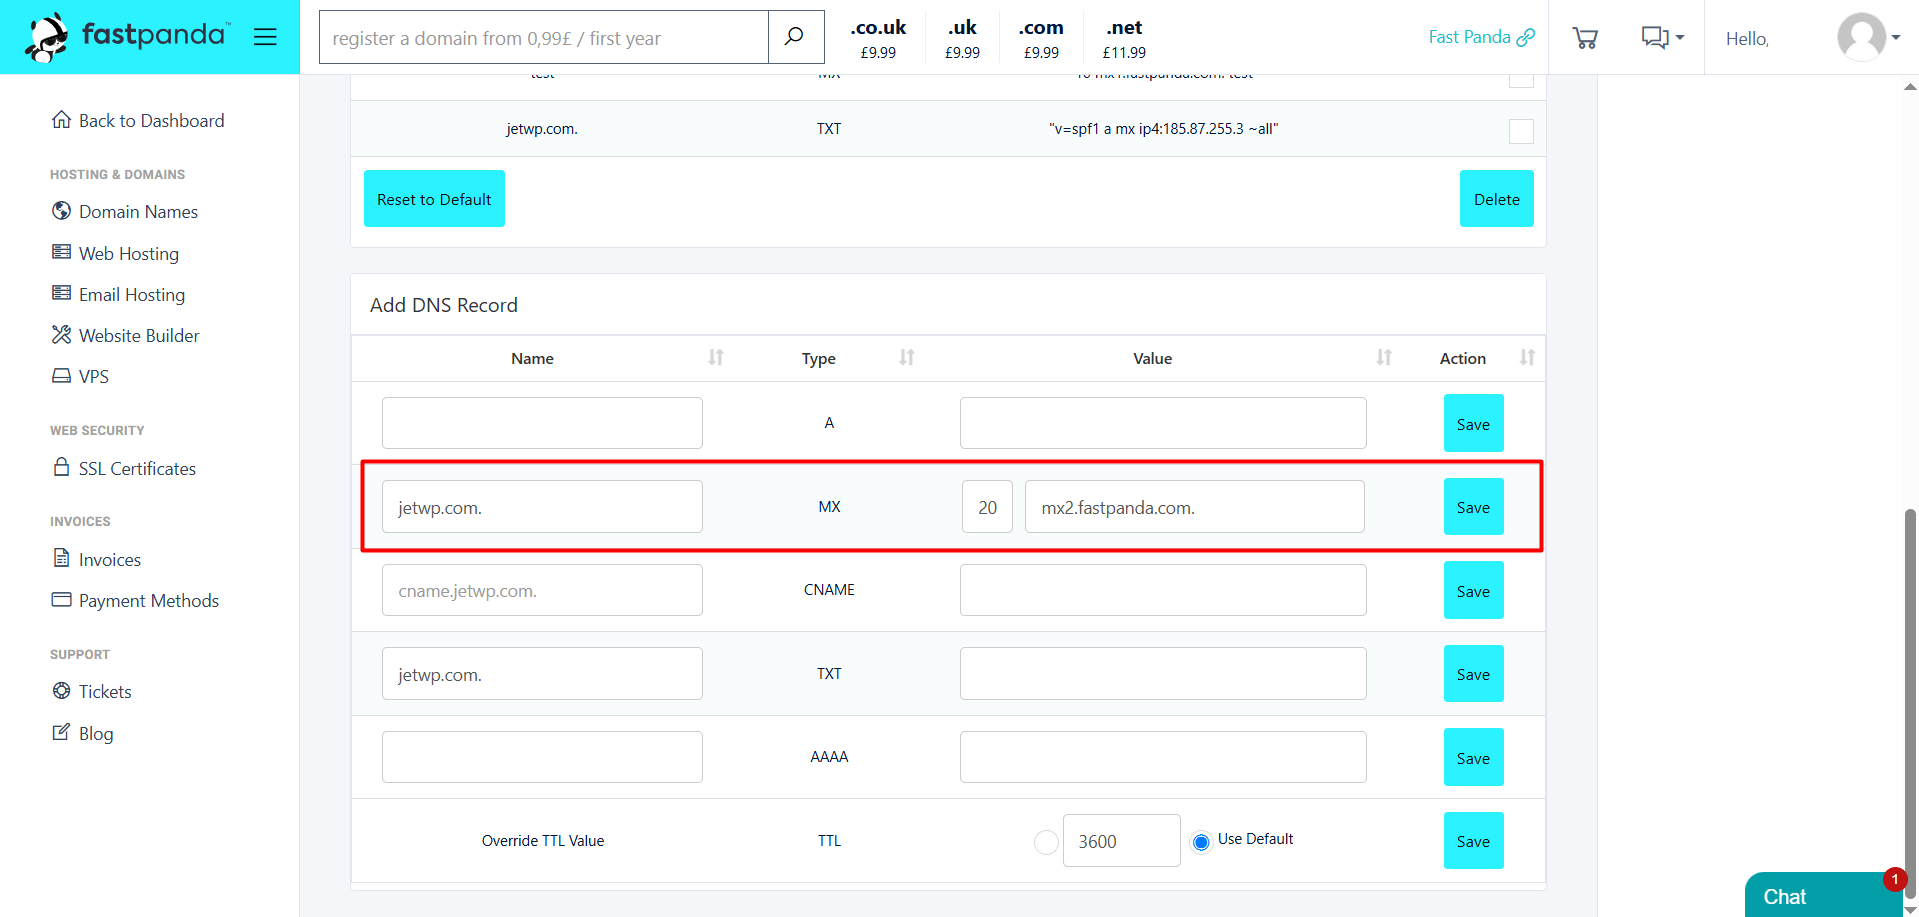
After adding the first record, proceed to the second record. On the Business Email Hosting > DNS Information page, the second record is also an MX record.
| Name | Type | Priority | Target |
| yourdomain.com. | MX | 20 | mx2.fastpanda.com. |
- In the “Name” box, enter yourdomain.extension. (your own domain).
- In the “Priority” box, enter “20” since the Business Email Hosting > DNS Information section specifies 20.
- In the “Value” box, enter the target value, which is mx2.fastpanda.com. (A dot must be added at the end of the record.)
- If you are sure the records are correct, click the “Save” button.
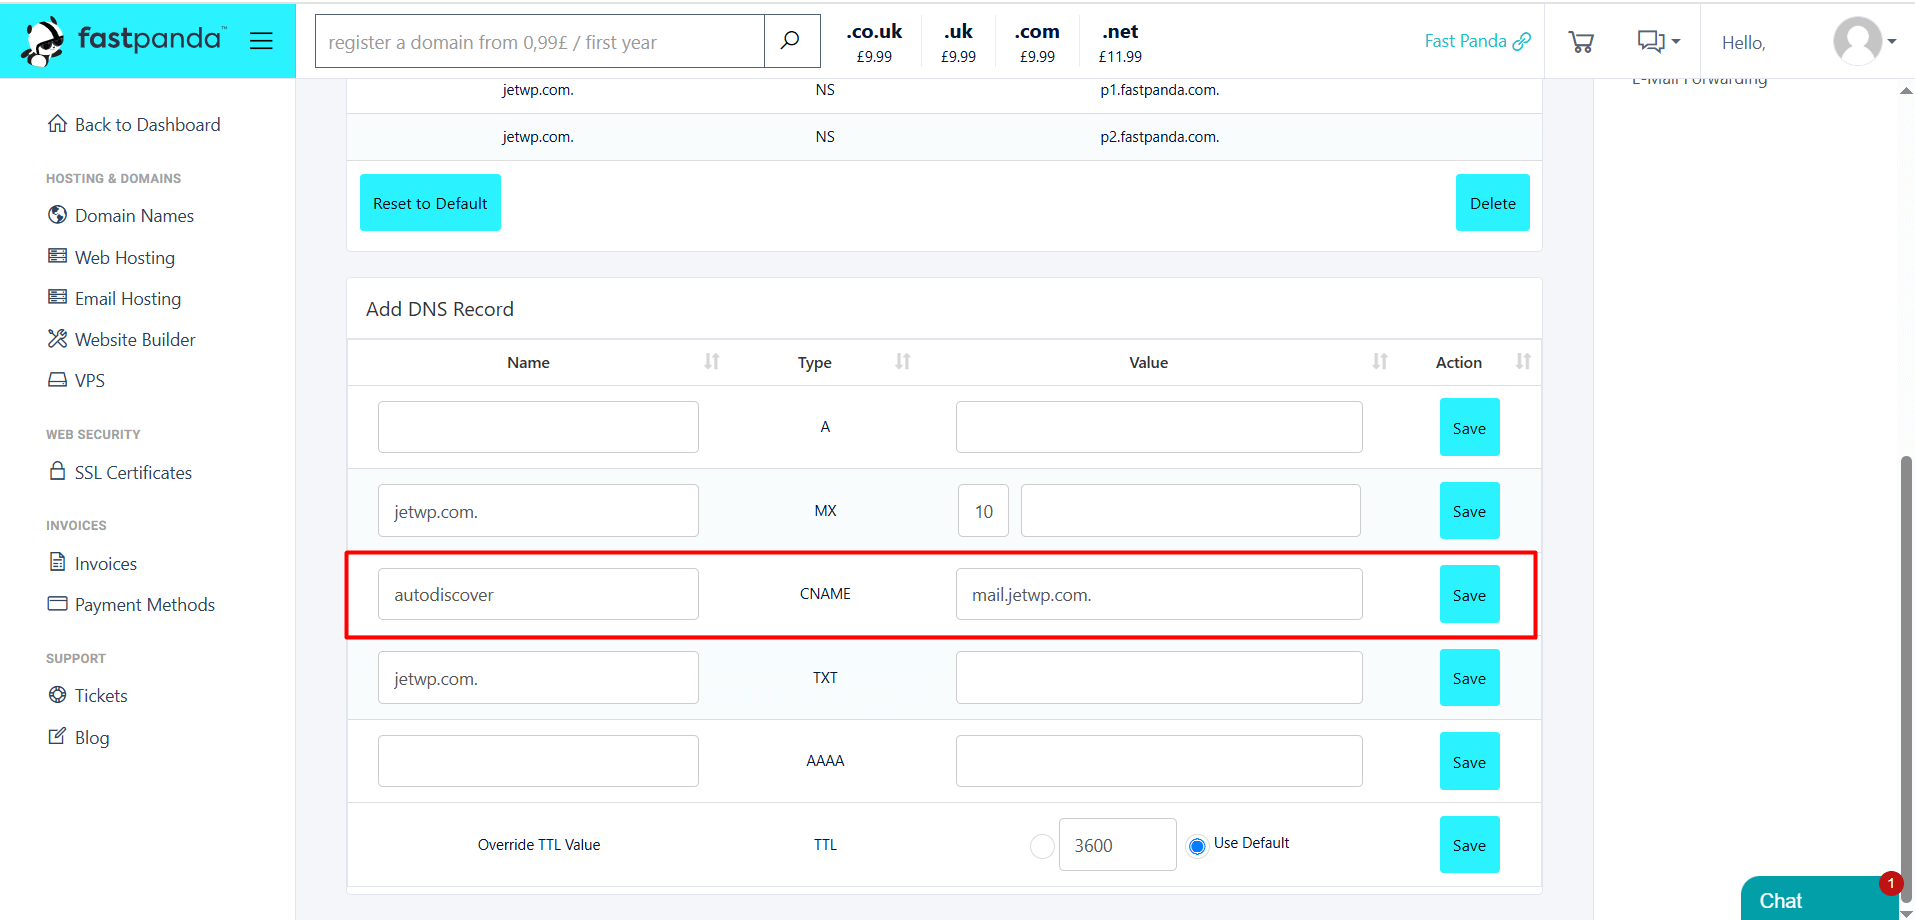
The third record on the Business Email Hosting > DNS Information page is a CNAME record.
| Name | Type | Priority | Target |
| autodiscover | CNAME | mail.yourdomain.com. |
- In the “Name” box, enter autodiscover
- In the “Value” box, enter the target value, which is mail.yourdomain.com.
- If you are sure the records are correct, click the “Save” button.
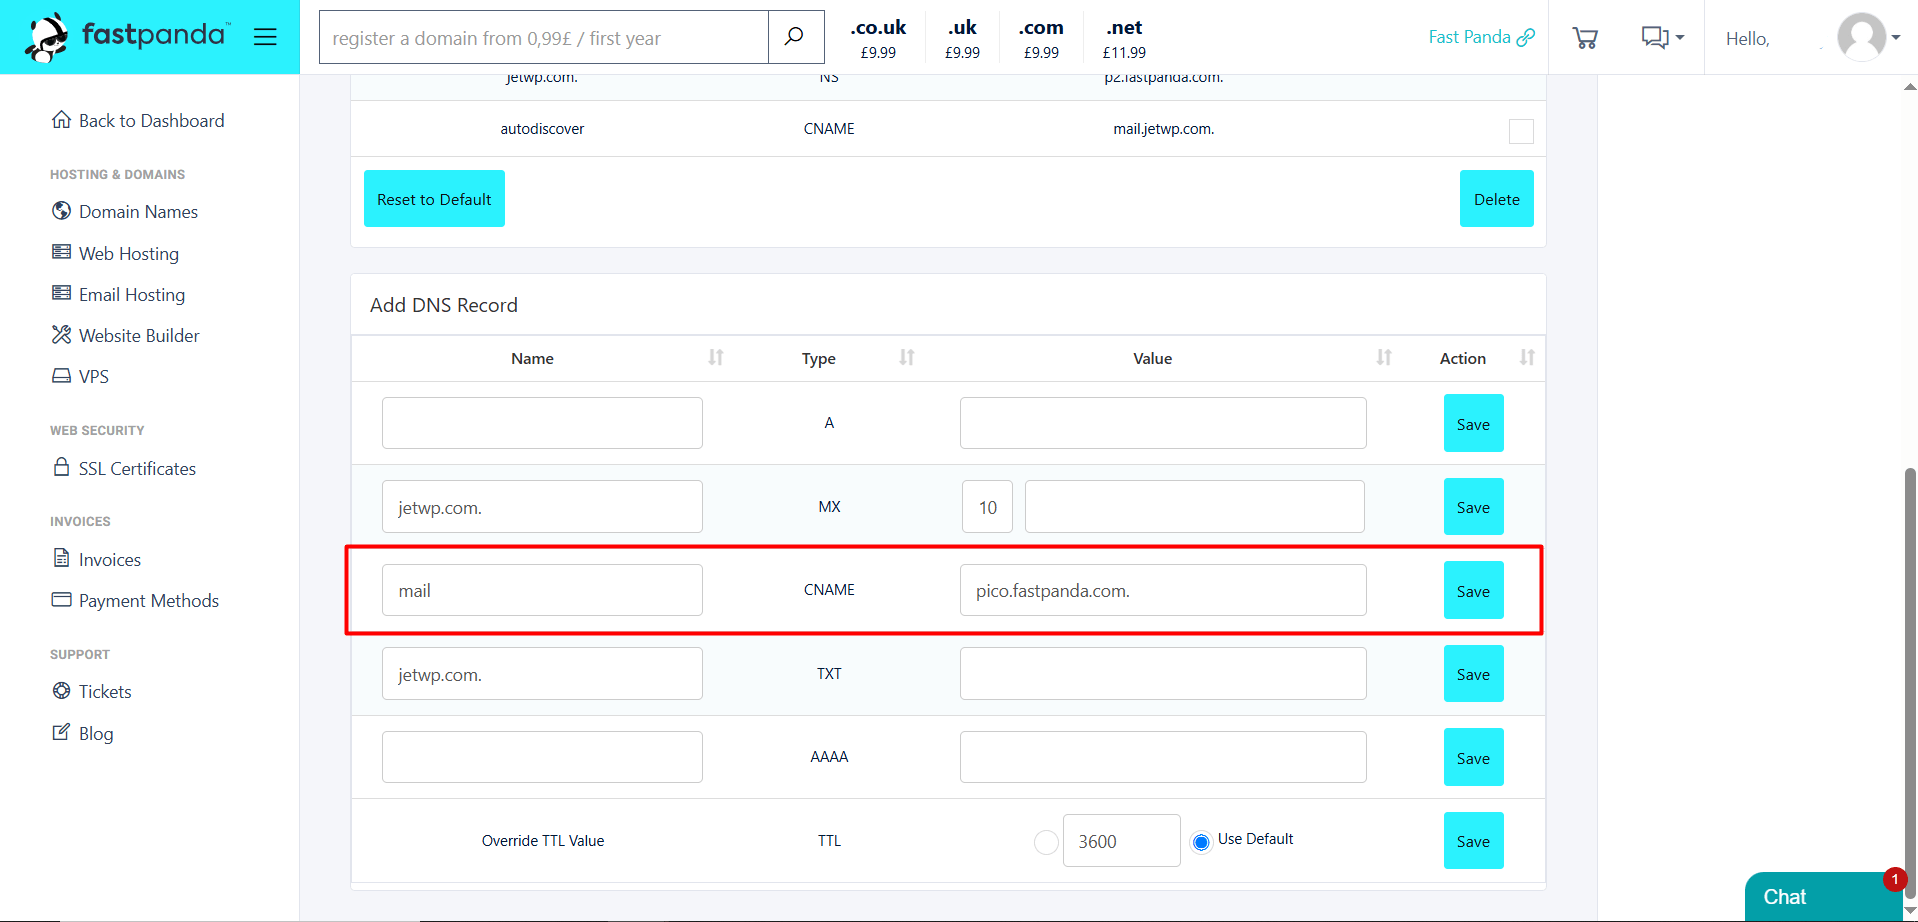
The fourth record on the Business Email Hosting > DNS Information page is a CNAME record.
| Name | Type | Priority | Target |
| CNAME | pico.fastpanda.com. |
- In the “Name” box, enter mail
- In the “Value” box, enter the target value, which is pico.fastpanda.com. (A dot must be added at the end of the record.)
- If you are sure the records are correct, click the “Save” button.
The fifth record on the Business Email Hosting > DNS Information page is a CNAME record.
| Name | Type | Priority | Target |
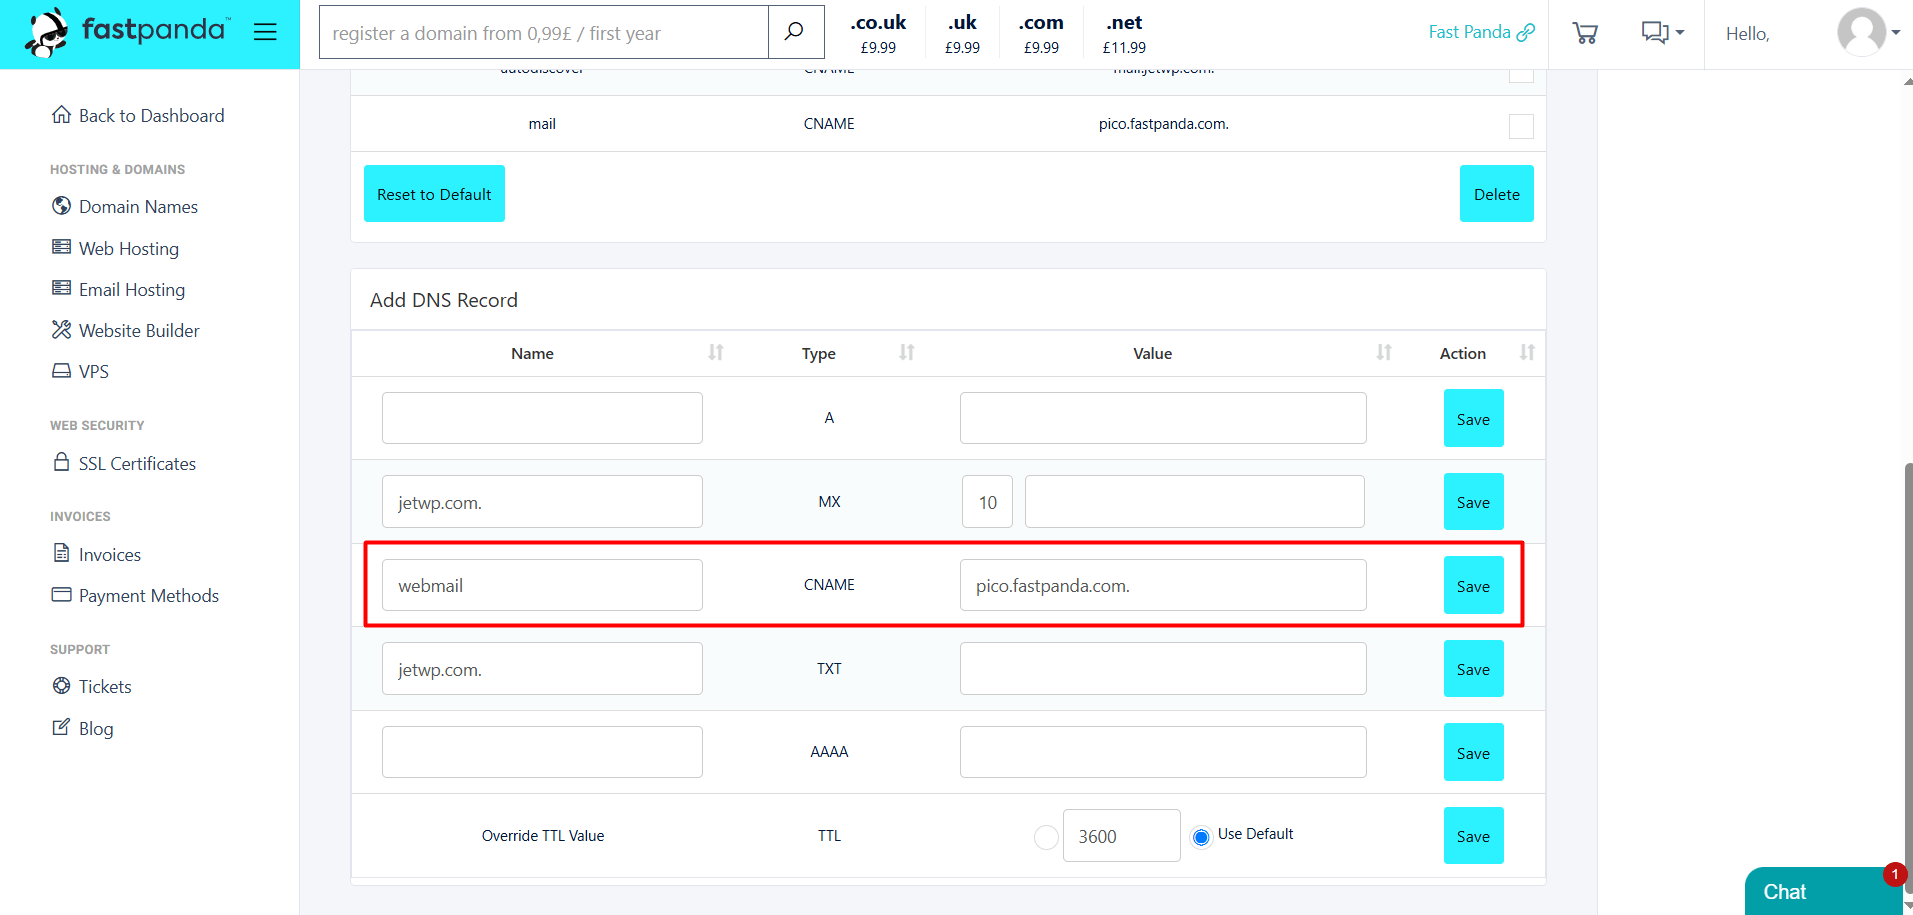
| webmail | CNAME | pico.fastpanda.com. |
- In the “Name” box, enter webmail
- In the “Value” box, enter the target value, which is pico.fastpanda.com. (A dot must be added at the end of the record.)
- If you are sure the records are correct, click the “Save” button.
The sixth record on the Business Email Hosting > DNS Information page is a TXT record.
| Name | Type | Priority | Target |
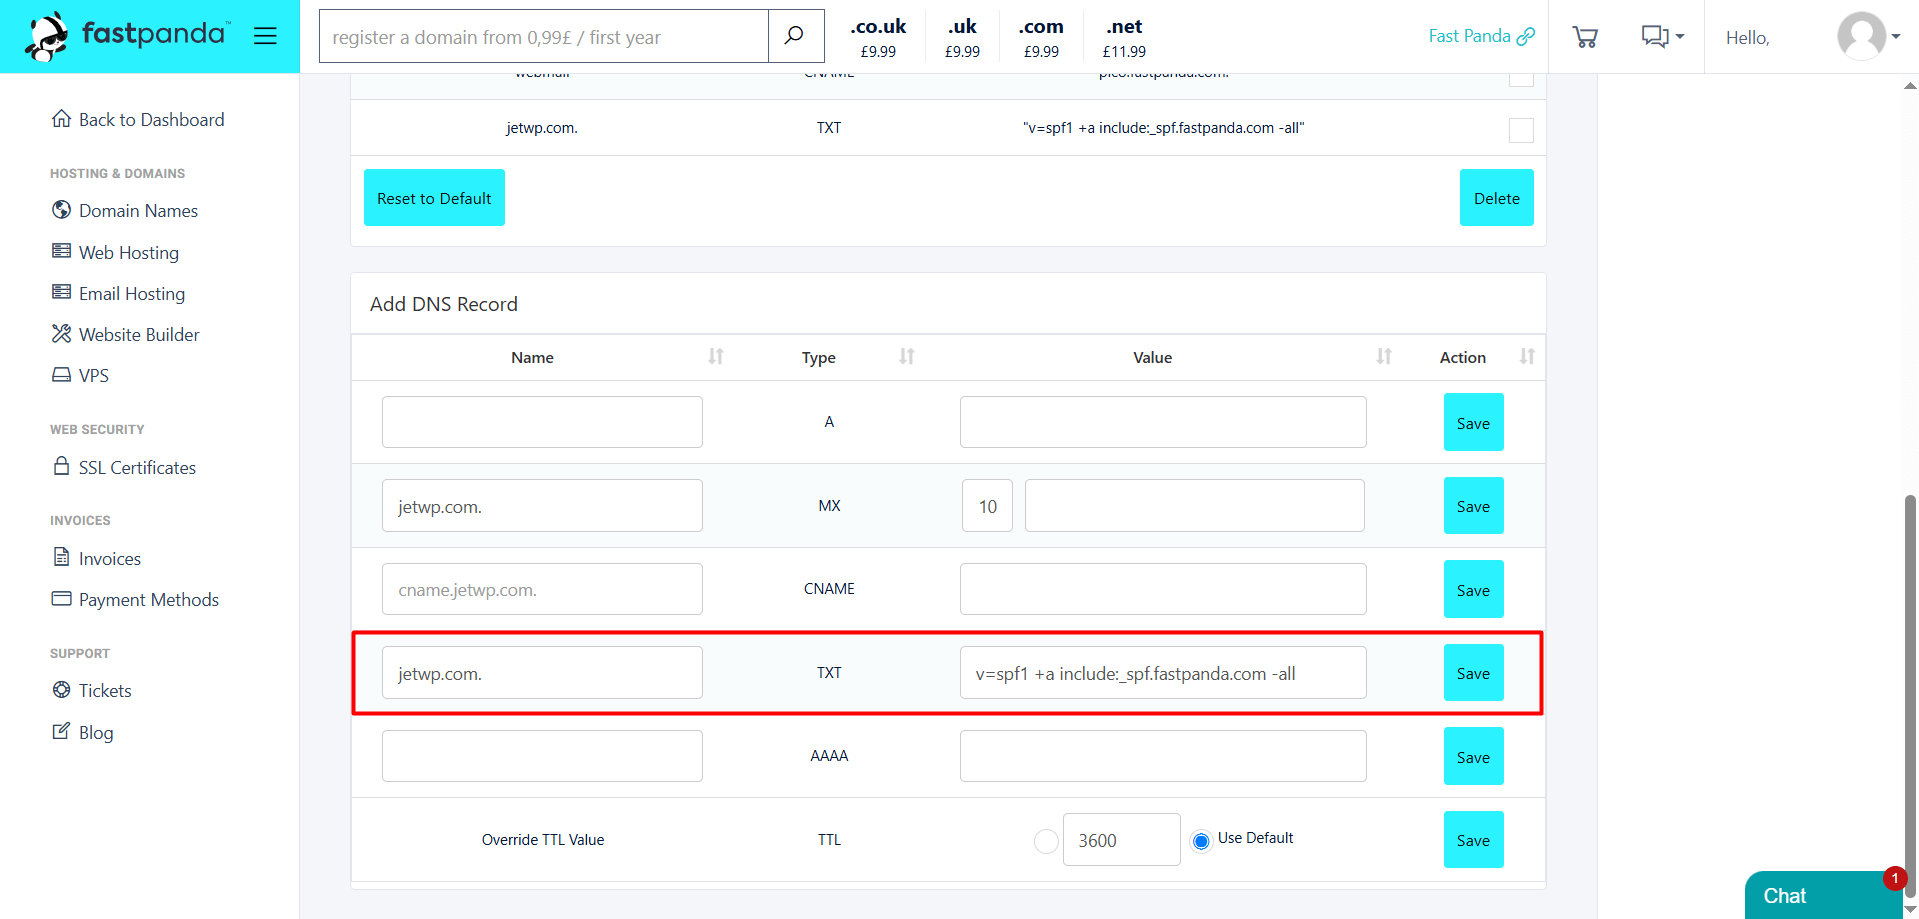
| yourdomain.com. | TXT | v=spf1 +a include:_spf.fastpanda.com -all |
- In the “Name” box, enter yourdomain.com.
- In the “Value” box, enter the target value, which is v=spf1 +a include:_spf.fastpanda.com -all
- If you are sure the records are correct, click the “Save” button.
The seventh record on the Business Email Hosting > DNS Information page is an SRV record. You need to contact the technical team to add this record.
The eighth record on the Business Email Hosting > DNS Information page is a TXT record.
| Name | Type | Priority | Target |
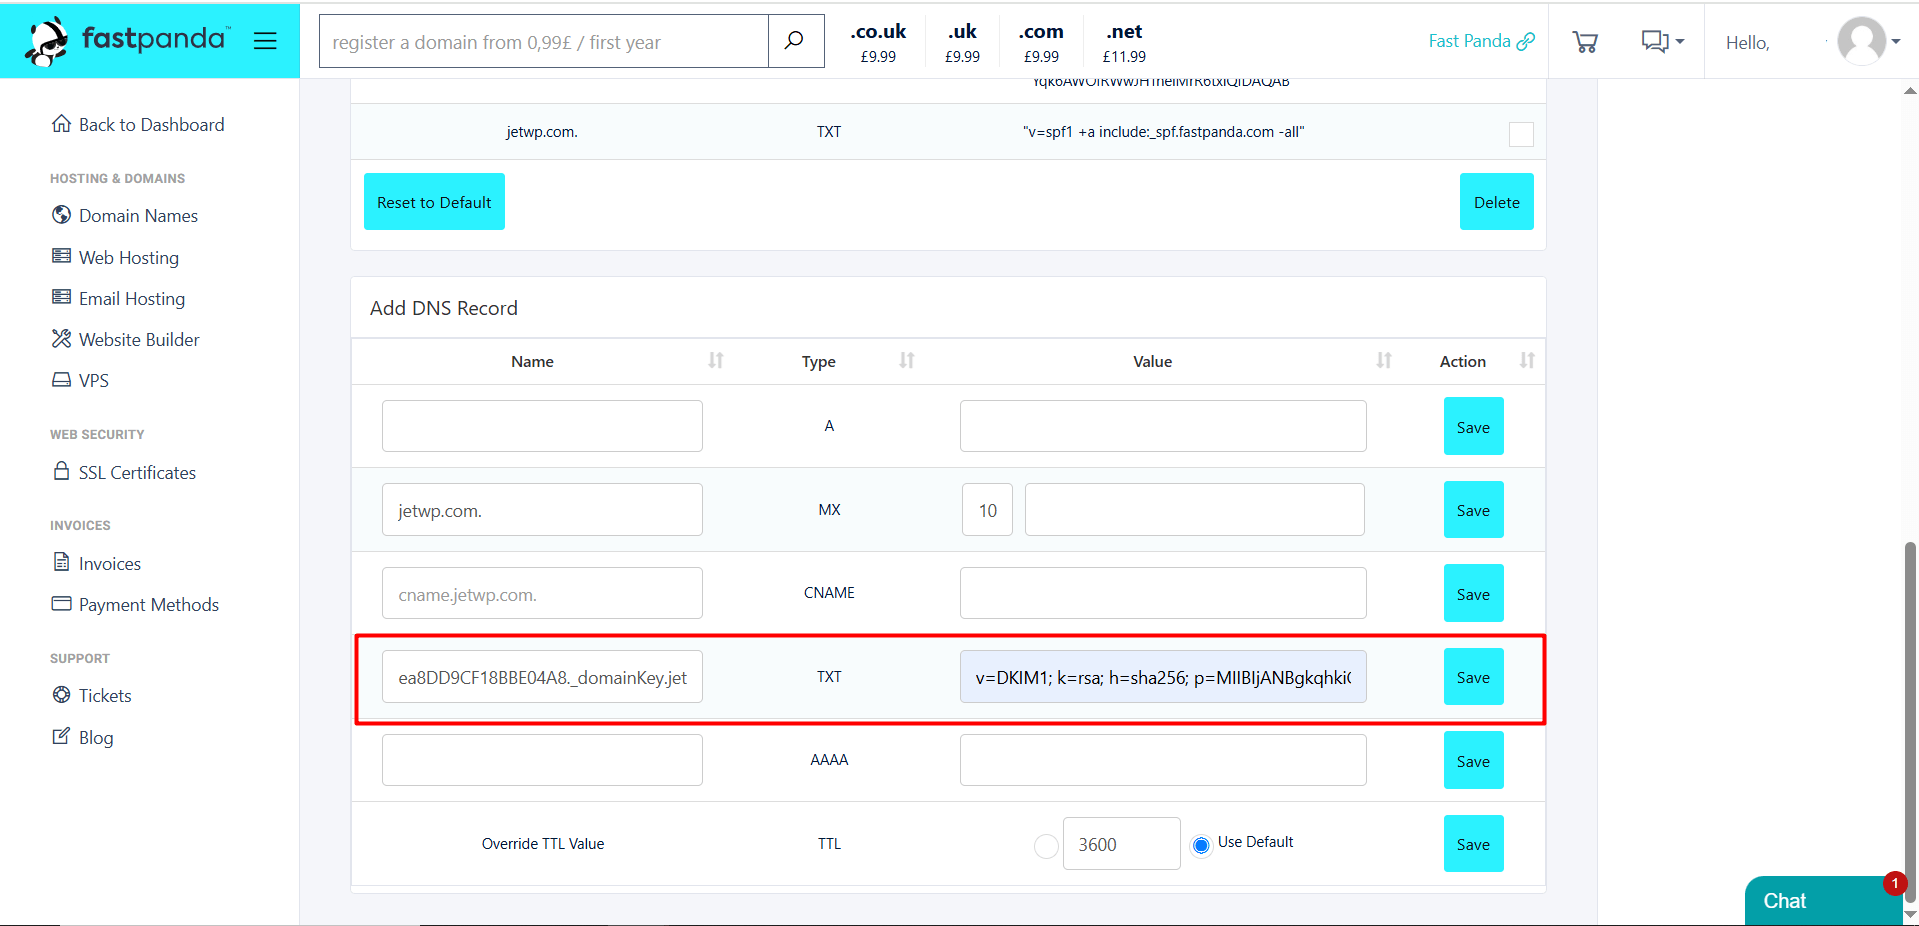
| ea8DD9CF18BBE04A8._domainKey | TXT | This record is exclusively available for the specified service. You can check the details on DNS Information page. |
- In the “Name” box, enter ea8DD9CF18BBE04A8._domainKey.yourdomain.com. (A dot must be added at the end of the record.)
- for the target section, “This record is exclusively available for the specified service. You can check the details on DNS Information page.”
- If you are sure the records are correct, click the “Save” button.
If you have added all the records completely and correctly, it may take up to approximately 24 hours for the records to propagate globally. After this process, you will be able to use your emails smoothly.
Note: Records may vary. Please make sure to check all records directly from your own customer panel.


 .CO.UK Domain
 Linux Hosting
 Windows Hosting


